MEXC Deposit
How to Buy Crypto with Credit/Debit Card on MEXC
Buy Crypto with Credit/Debit card on MEXC (Website)
1. Log in to your MEXC account, click on [Buy Crypto] and select [Debit/Credit Card].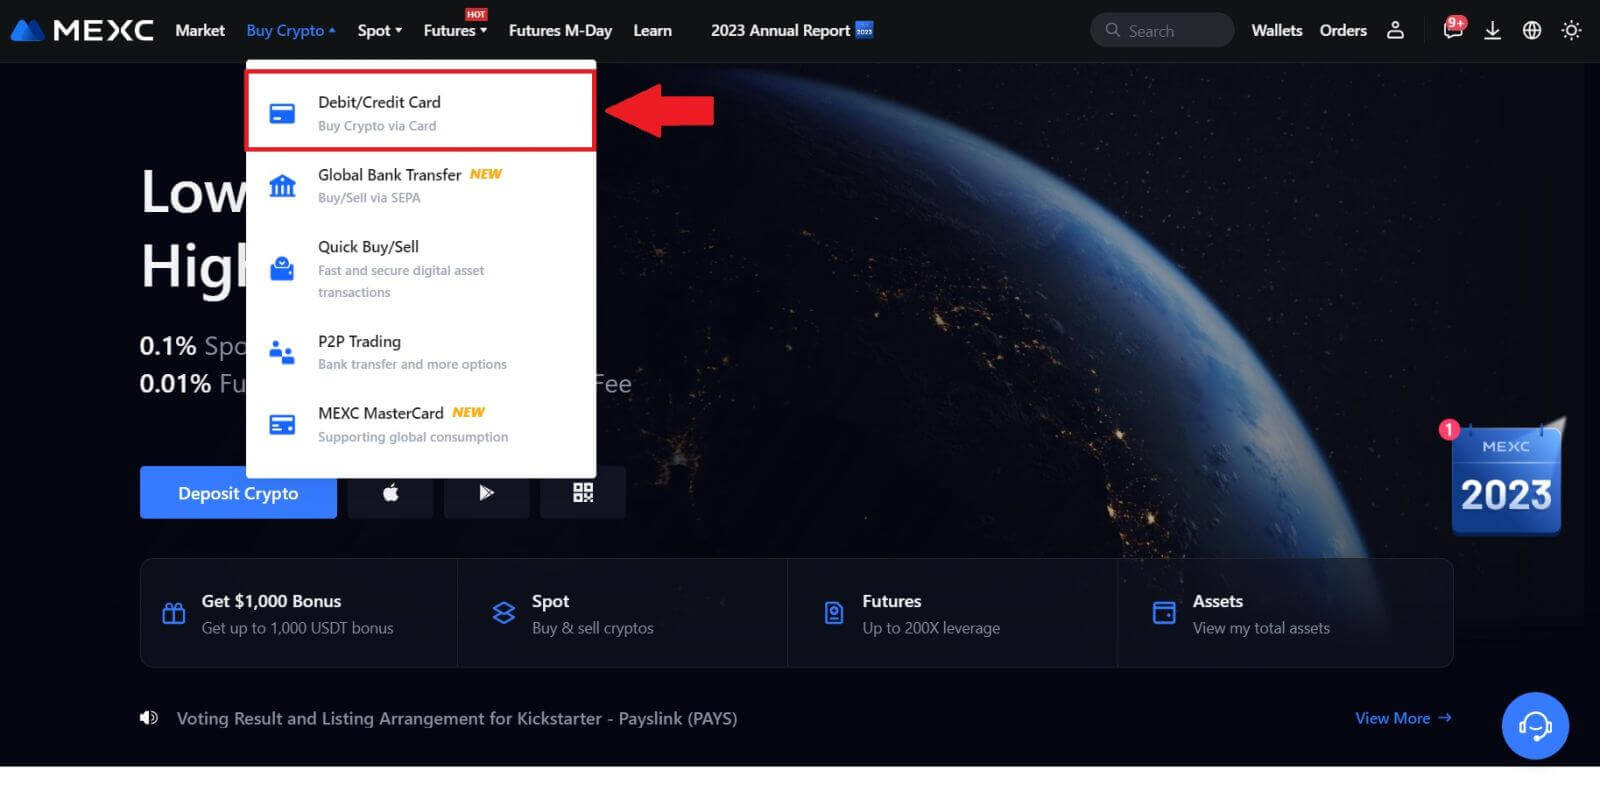
2. Click on [Add Card].
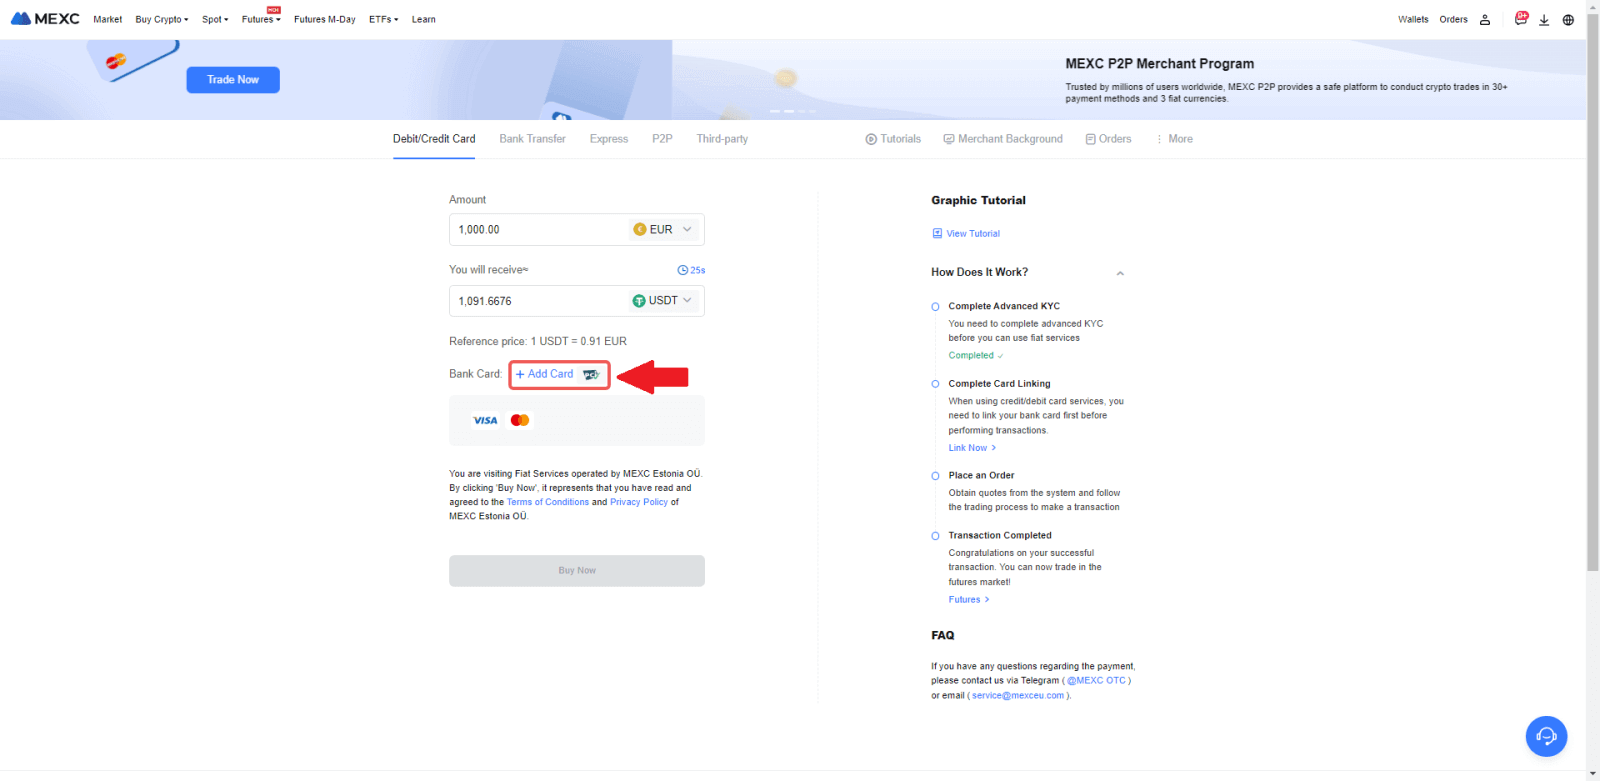
3. Enter your bank card details and click [Continue].
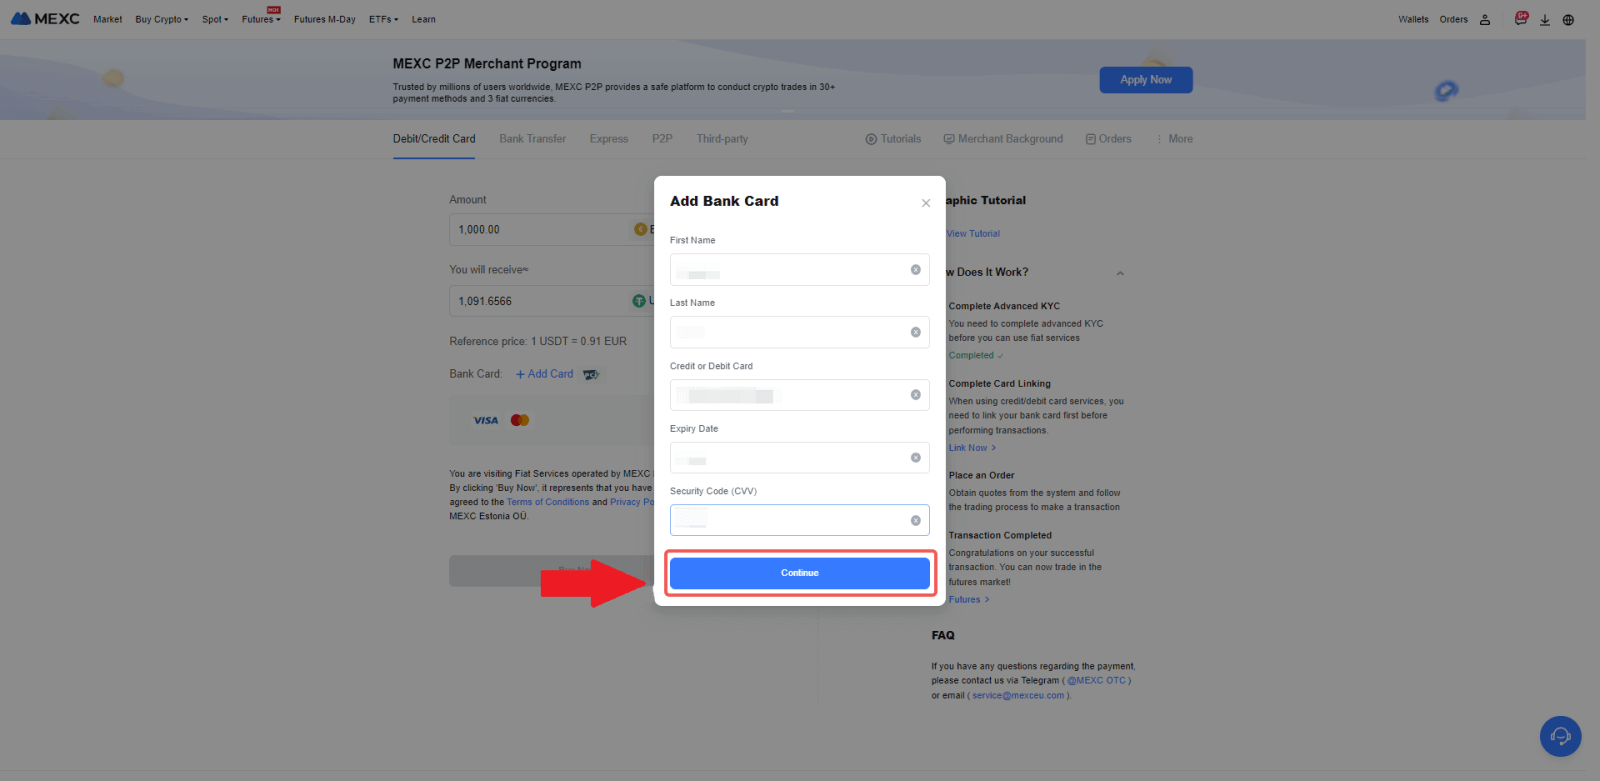
4.Initiate your cryptocurrency purchase using a Debit/Credit Card by first completing the card linking process.
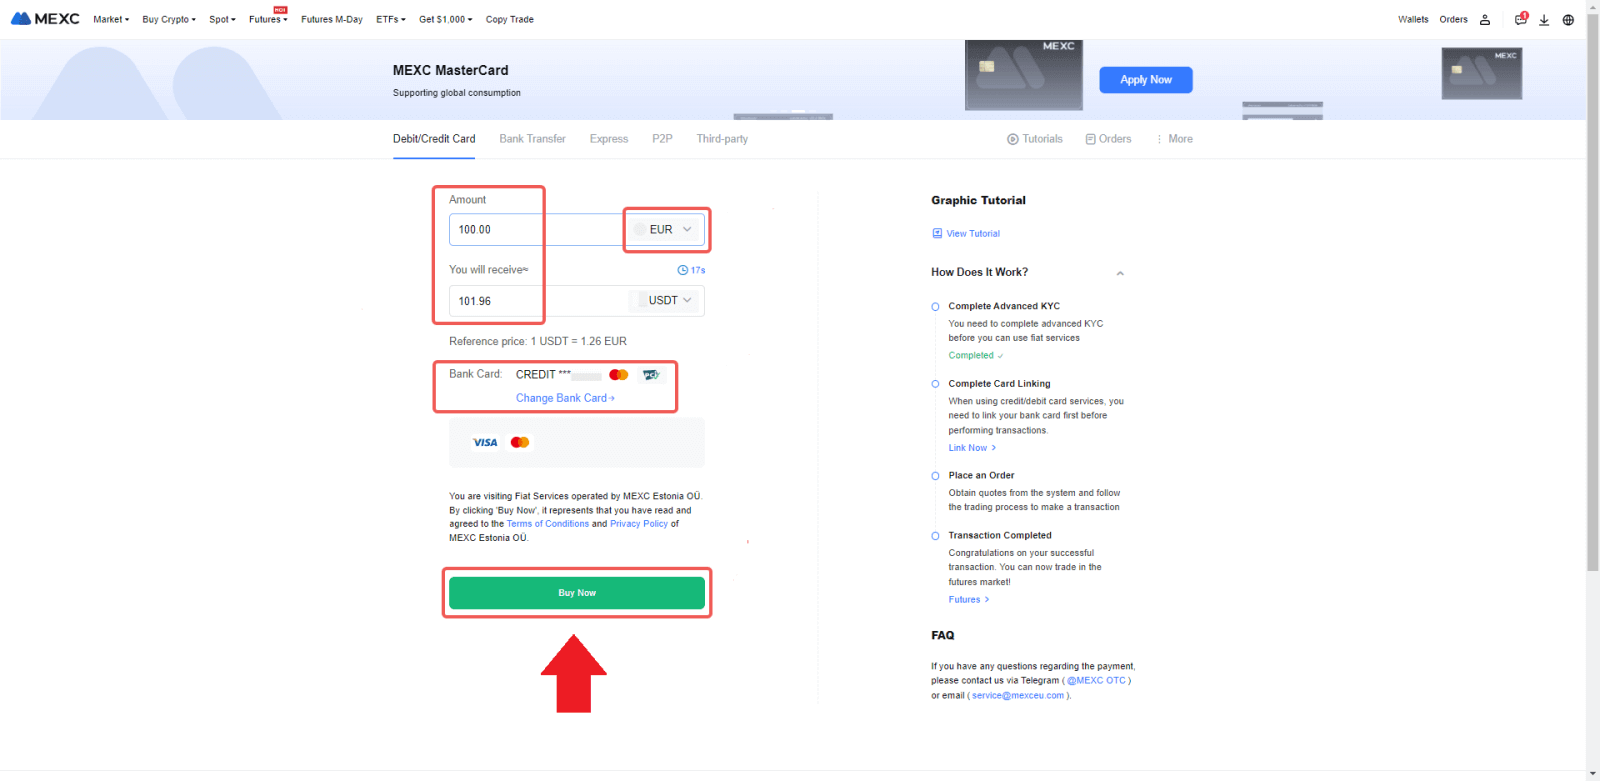
Choose your preferred Fiat Currency for the payment, enter the amount for your purchase. The system will instantly show you the corresponding amount of cryptocurrency based on the current real-time quote.
Choose the Debit/Credit Card you plan to use, and click on [Buy Now] to proceed with the cryptocurrency purchase.
Buy Crypto with Credit/Debit card on MEXC (App)
1. Open your MEXC app, on the first page, tap [More].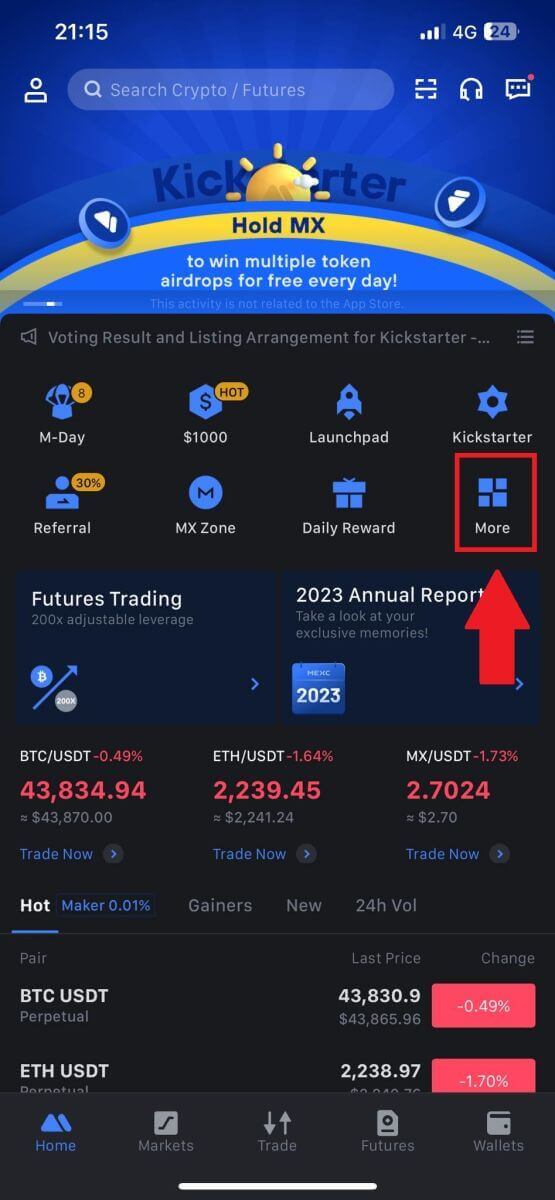
2. Tap on [Buy Crypto] to continue.
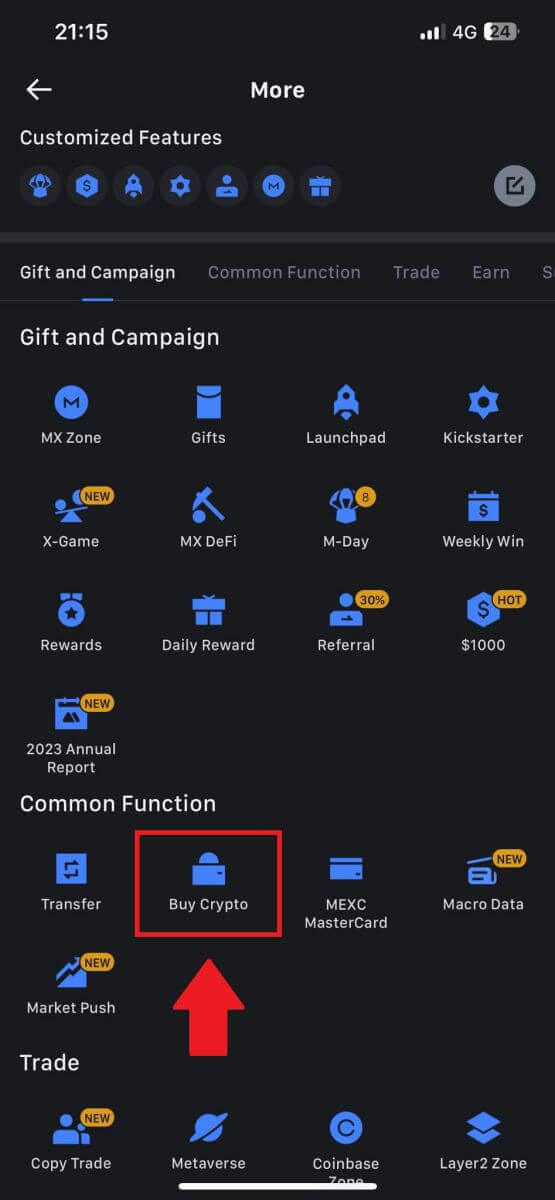
3. Scroll down to locate the [Use Visa/MasterCard].
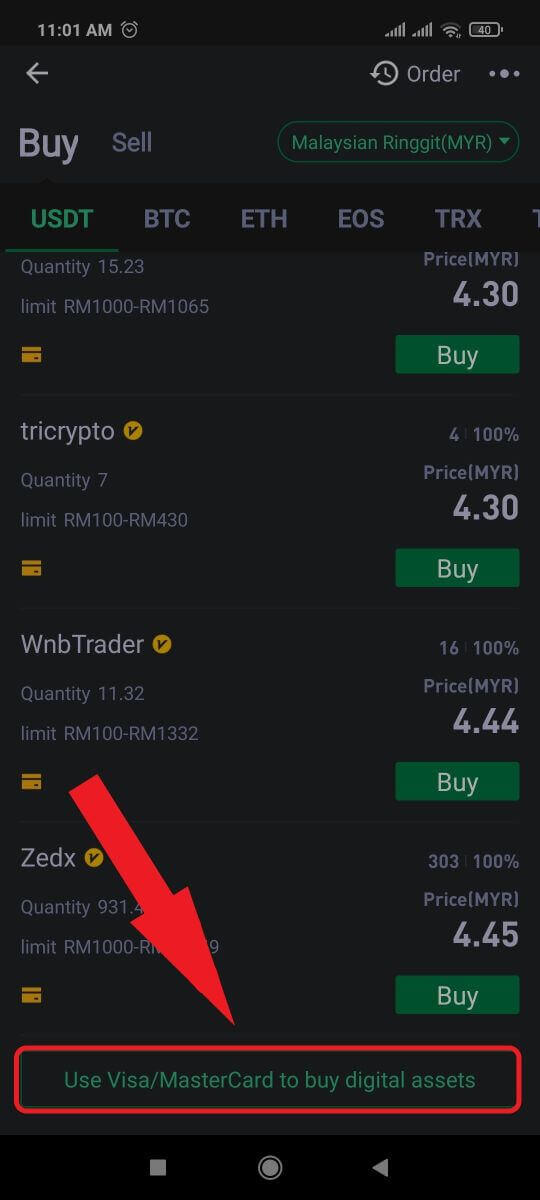
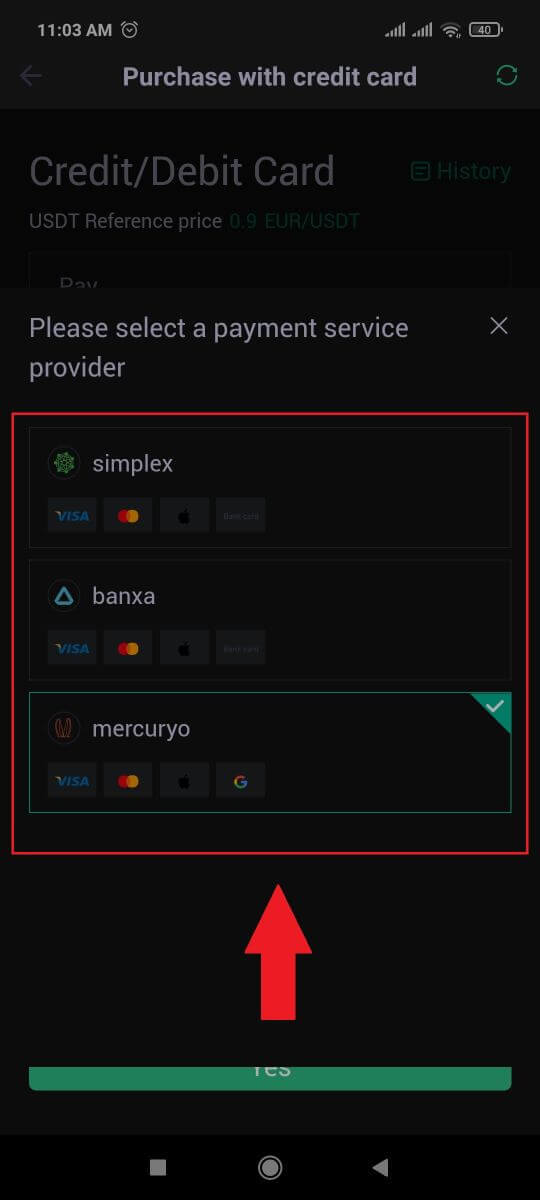
4. Select your Fiat currency, choose the crypto asset you want to purchase, and then pick your payment service provider. Then tap on [Yes].
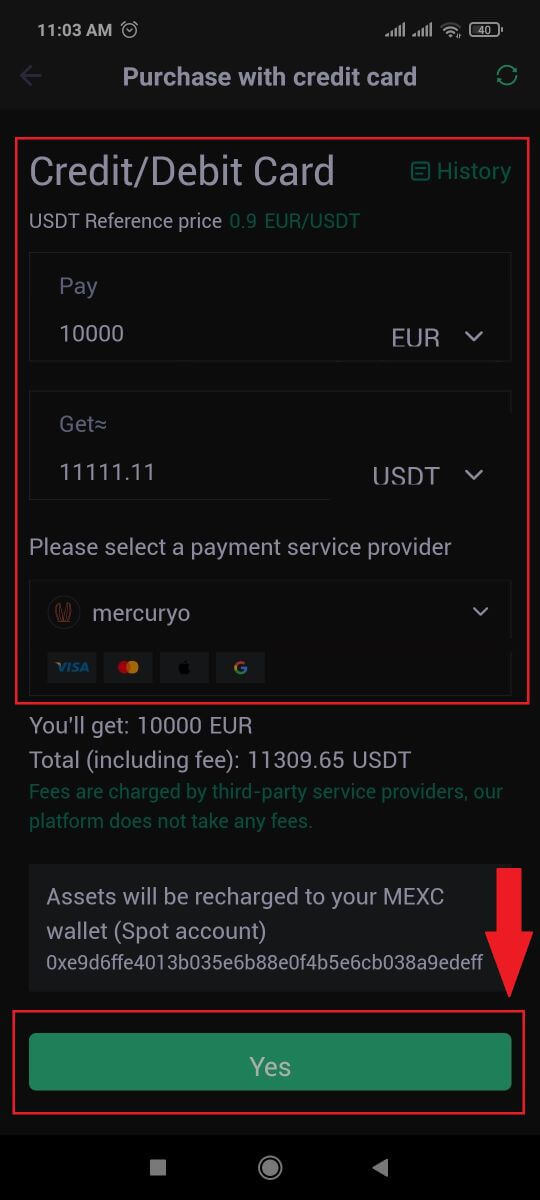
5. Keep in mind that various service providers support different payment methods and may have varying fees and exchange rates.
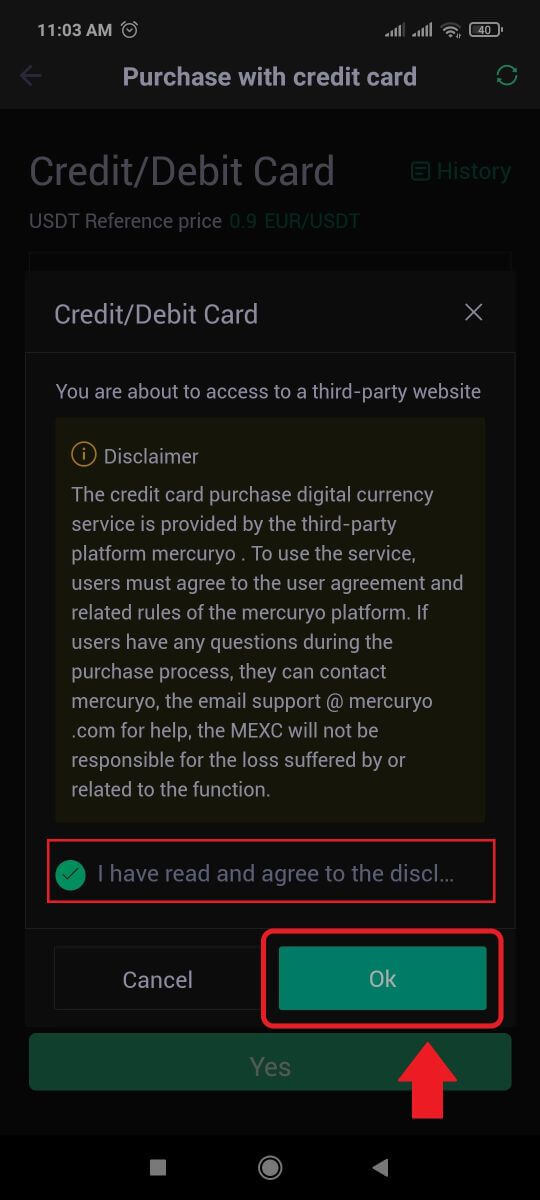
6. Tick on the box and tap [Ok]. You will be redirected to a third-party site. Please follow the provided instructions on that site to complete your transaction.
How to Buy Crypto via Bank Transfer - SEPA on MEXC
1. Log in to your MEXC website, click on [Buy Crypto] and select [Global Bank Transfer].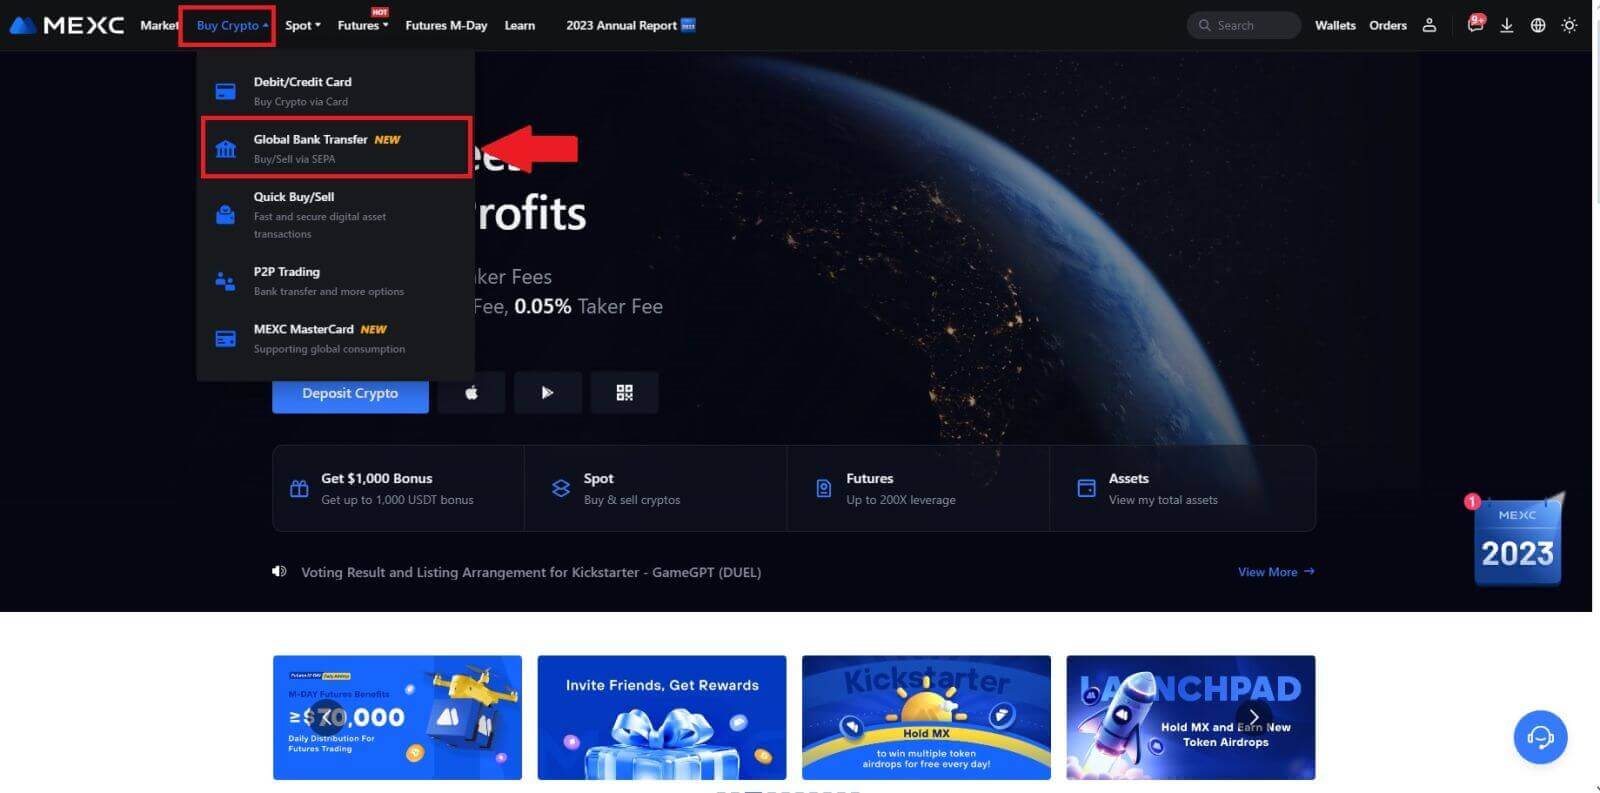
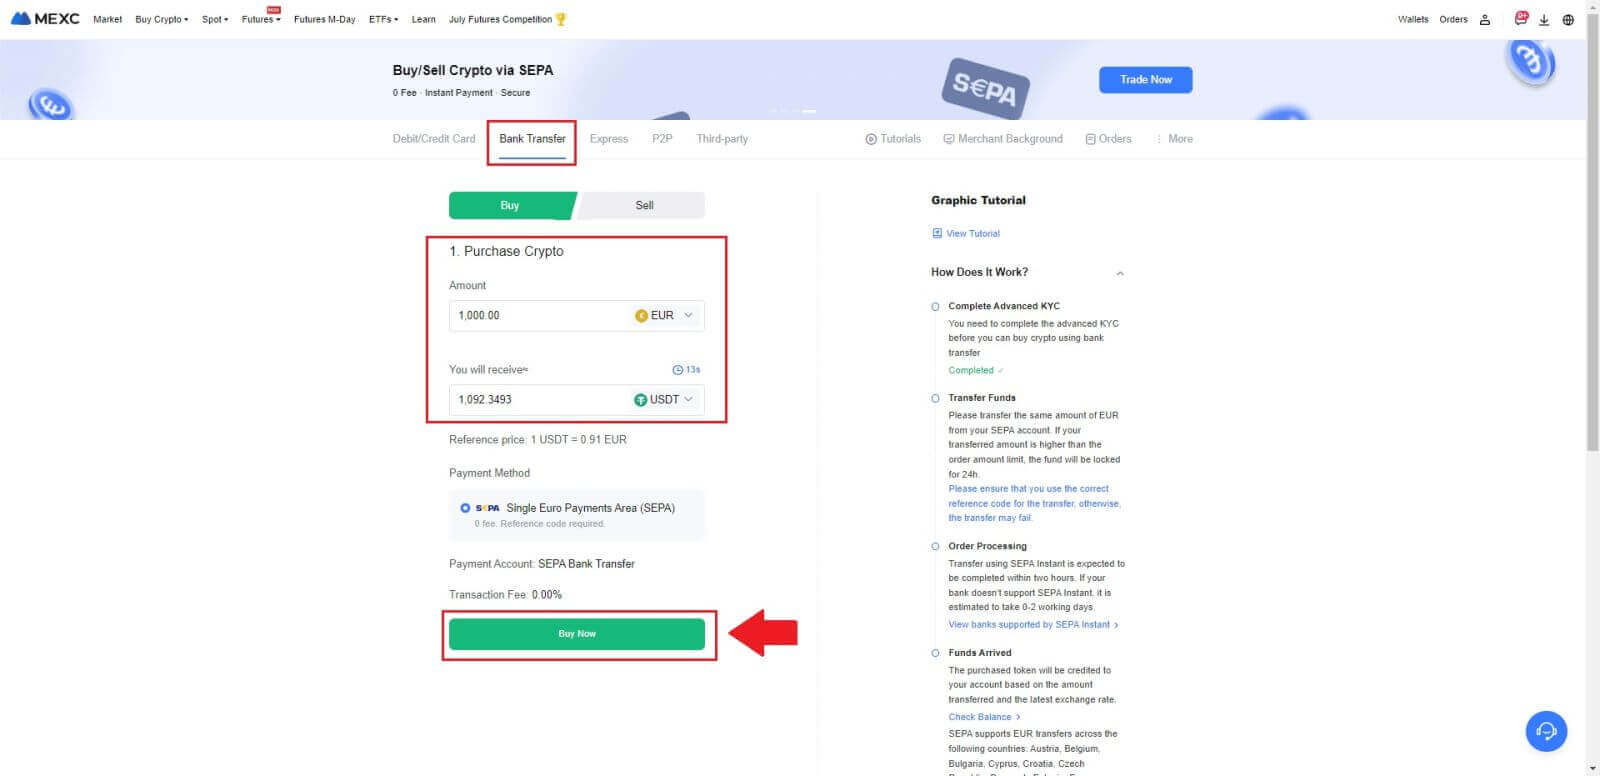
2. Select [Bank Transfer], fill out the amount of crypto that you want to purchase and click [Buy Now]
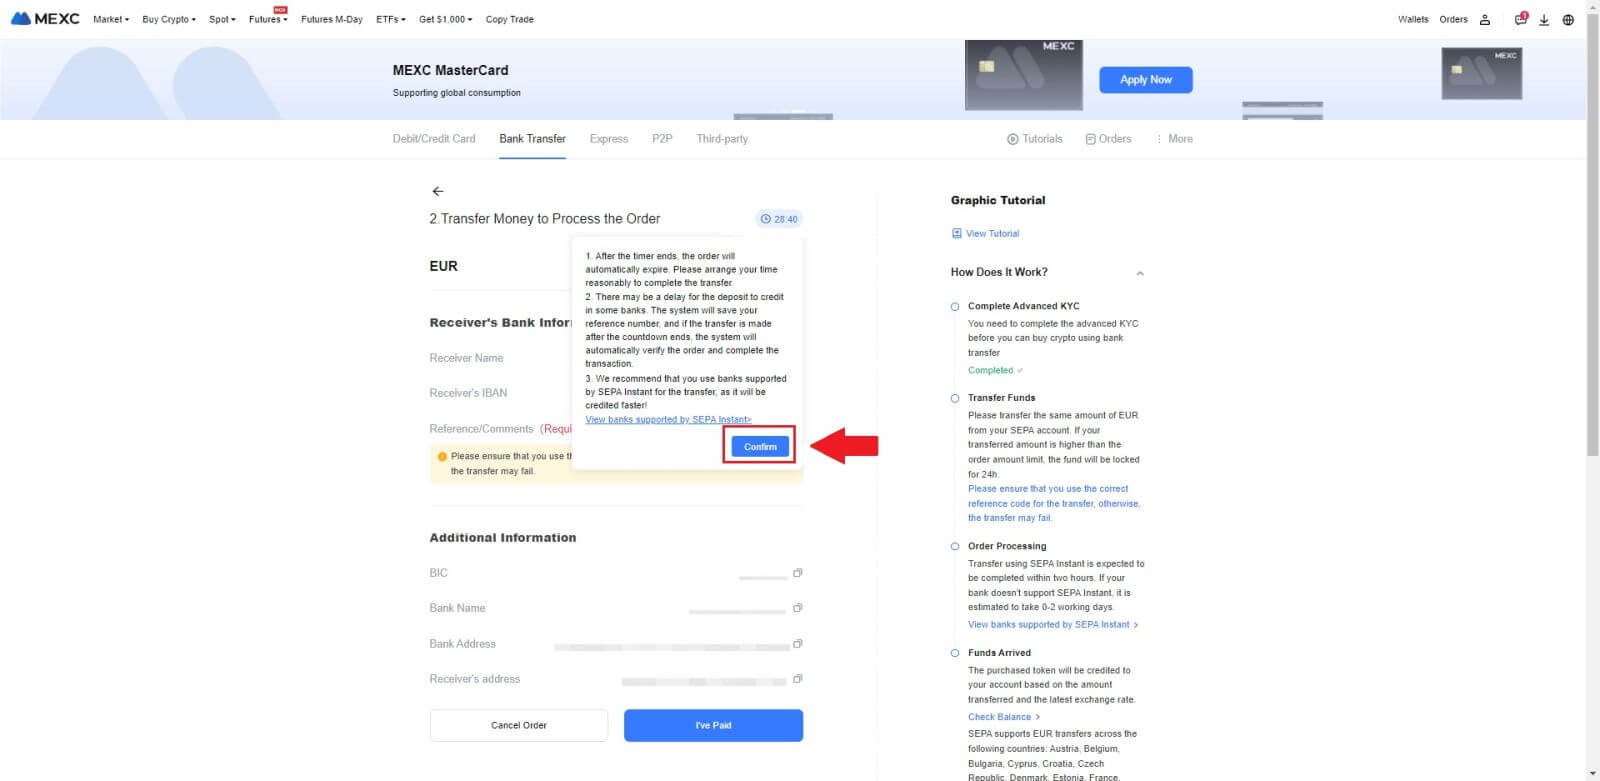
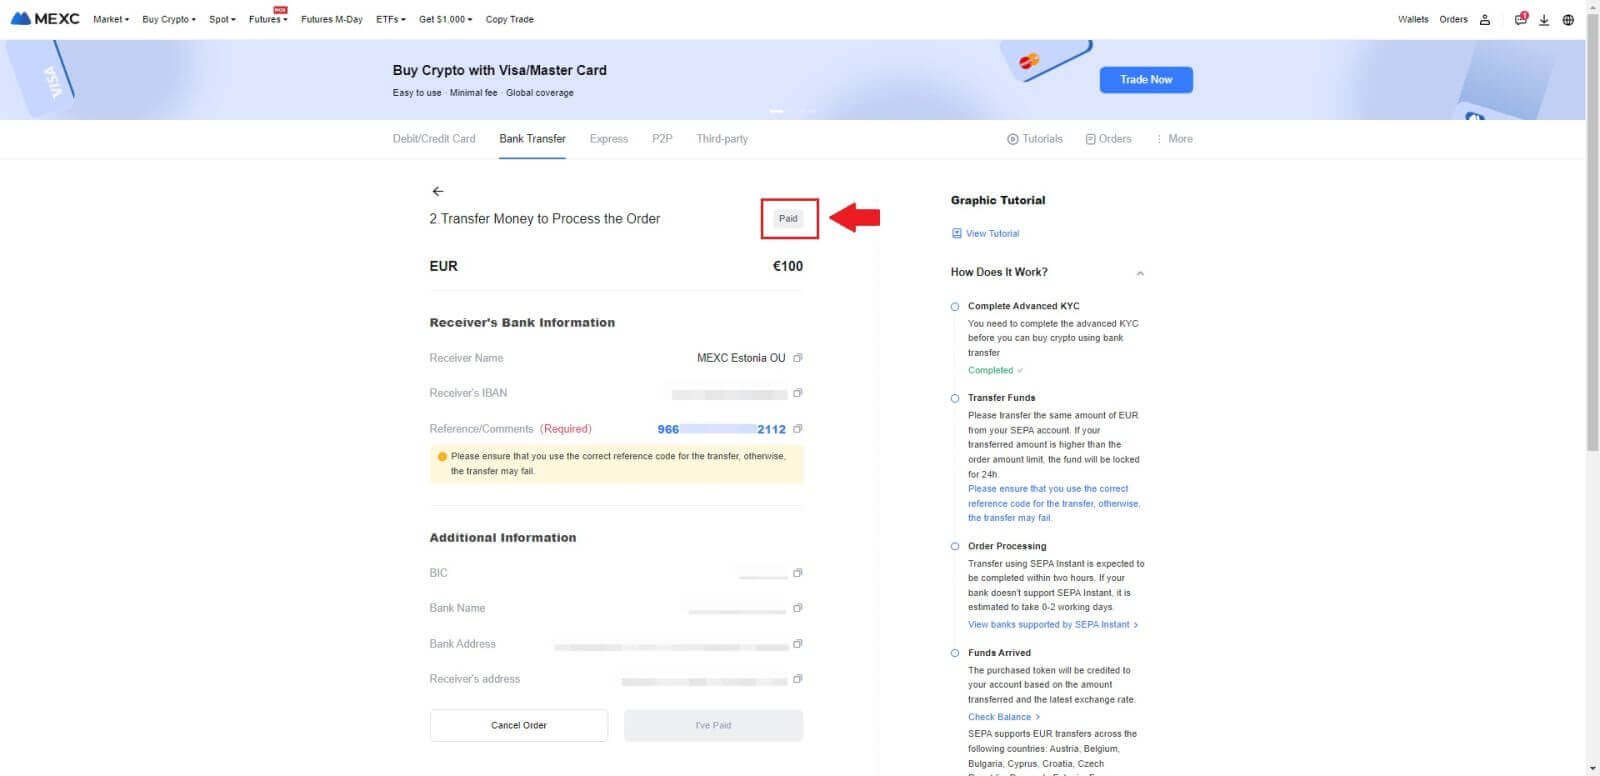
3. After placing a Fiat order, you have 30 minutes to pay. Click [Confirm] to continue.
Check the Order page for [Receiver’s Bank Information] and [Additional Information]. Once paid, click [I’ve paid] to confirm.
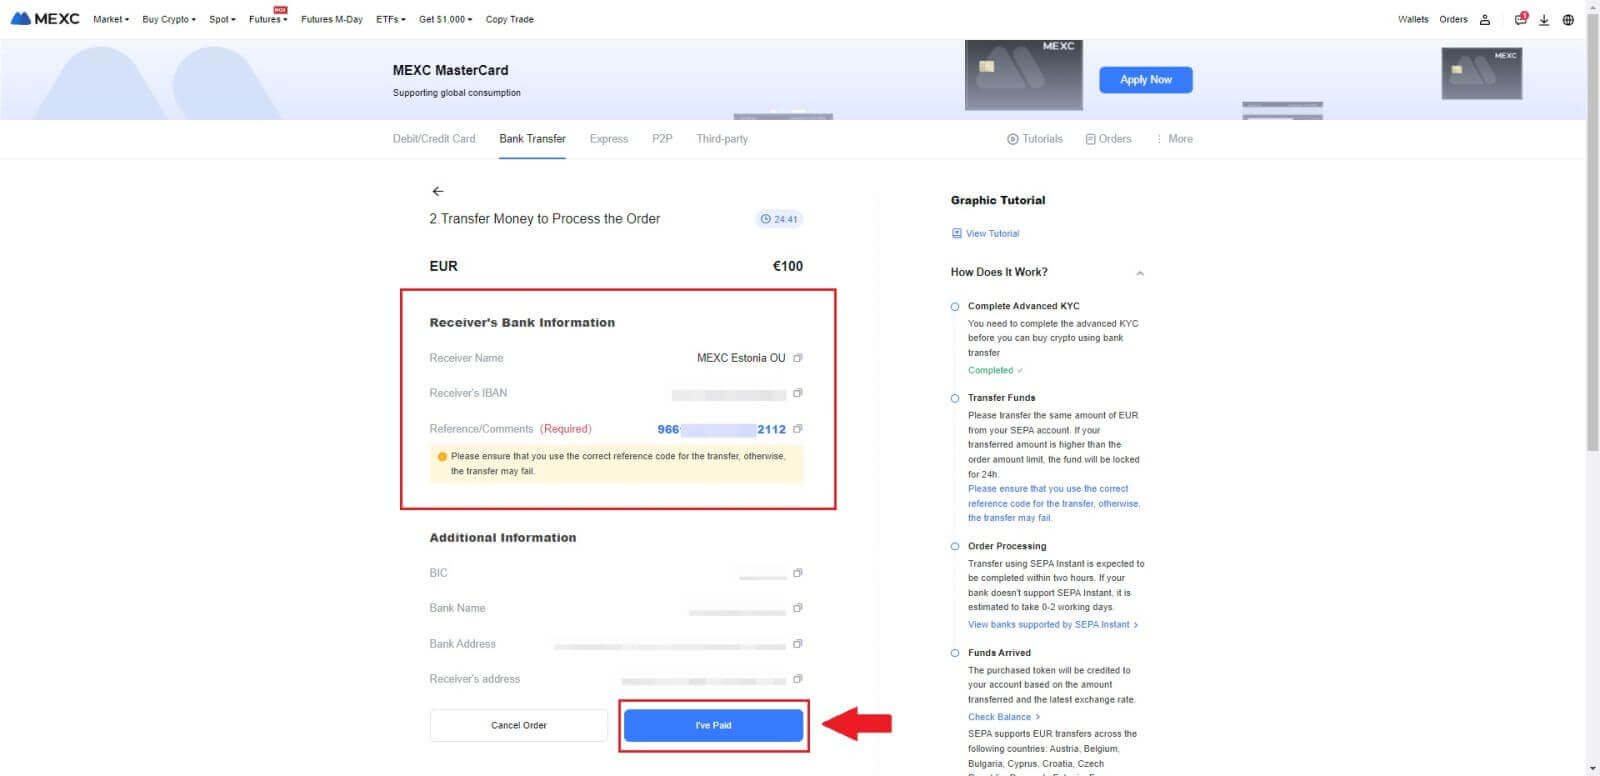
4. Once you mark the order as [Paid], the payment will be processed automatically.
If it’s a SEPA instant payment, the Fiat order is usually completed within two hours. For other payment methods, it may take 0-2 business days for the order to be finalized.
How to Buy Crypto via Third Party Channel on MEXC
Buy Crypto via Third Party on MEXC (Website)
1. Log in to your MEXC website, click on [Buy Crypto].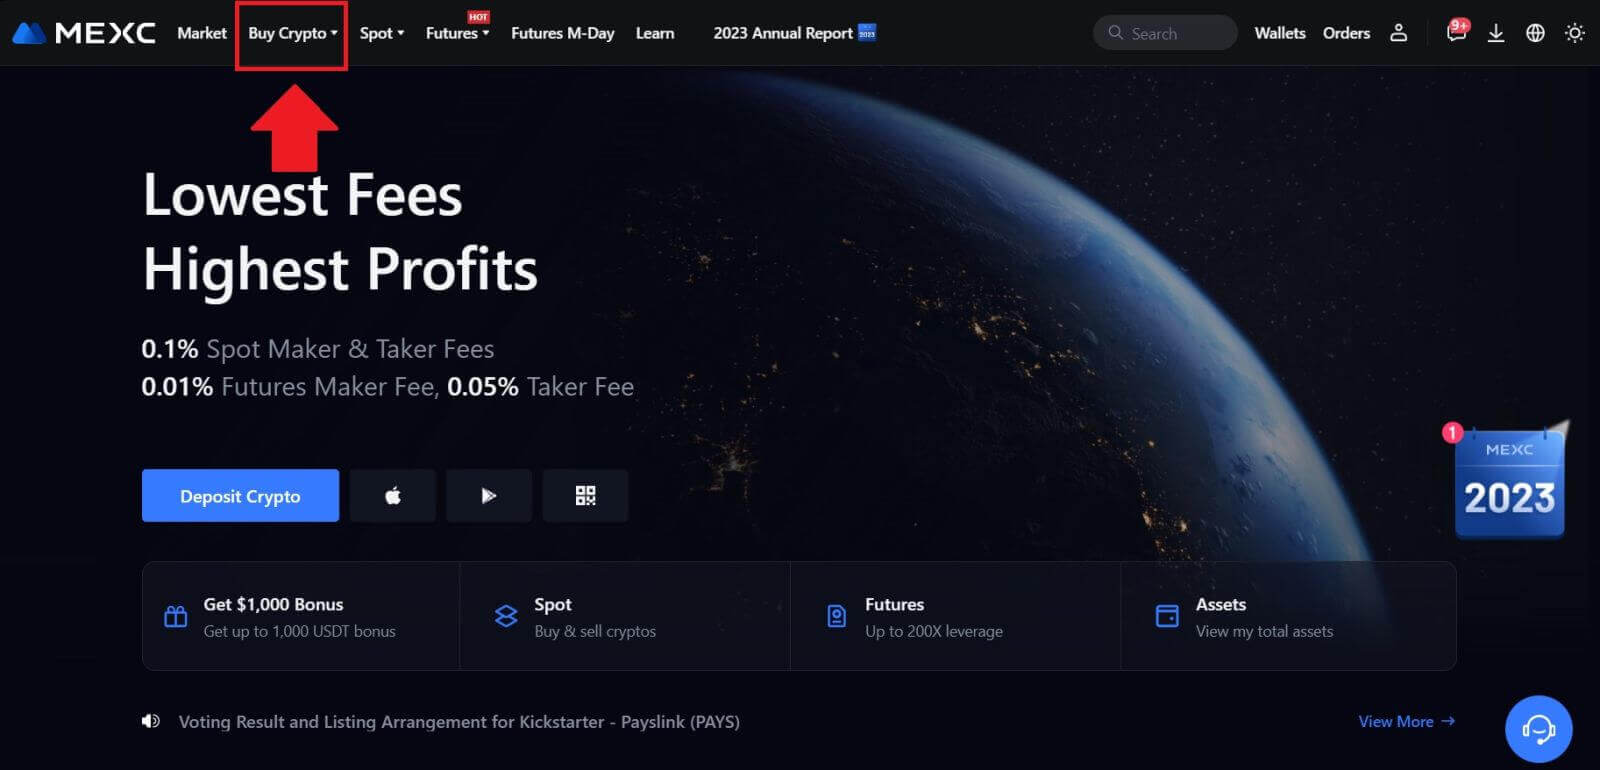 2. Choose [Third-party].
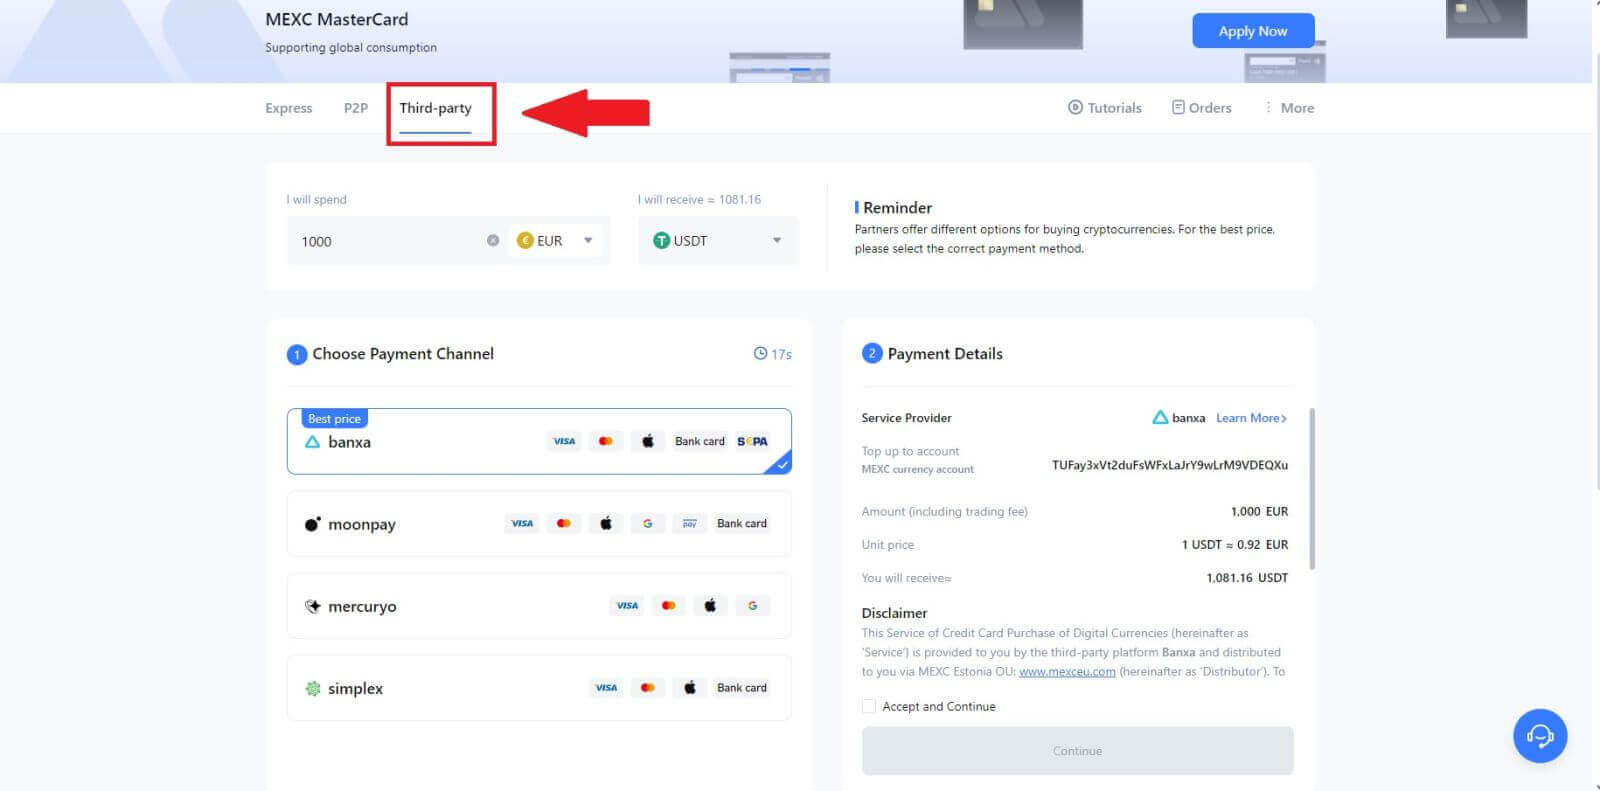
3. Enter and select the Fiat currency you want to pay for. Here, we take EUR as an example.
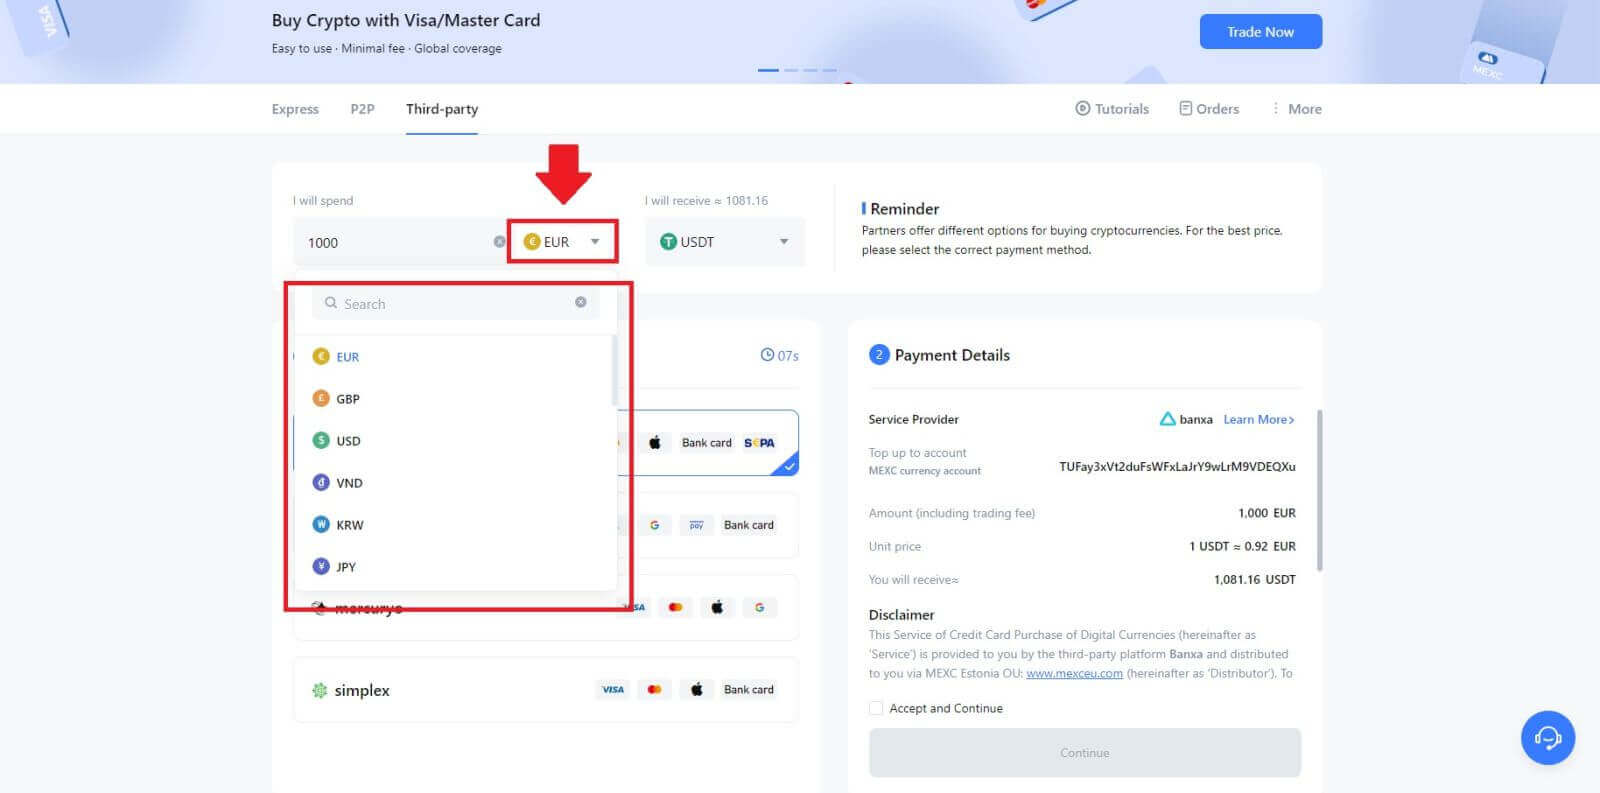
4. Choose the cryptocurrency you want to receive in your MEXC wallet. Options include USDT, USDC, BTC, and other commonly used altcoins and stablecoins.
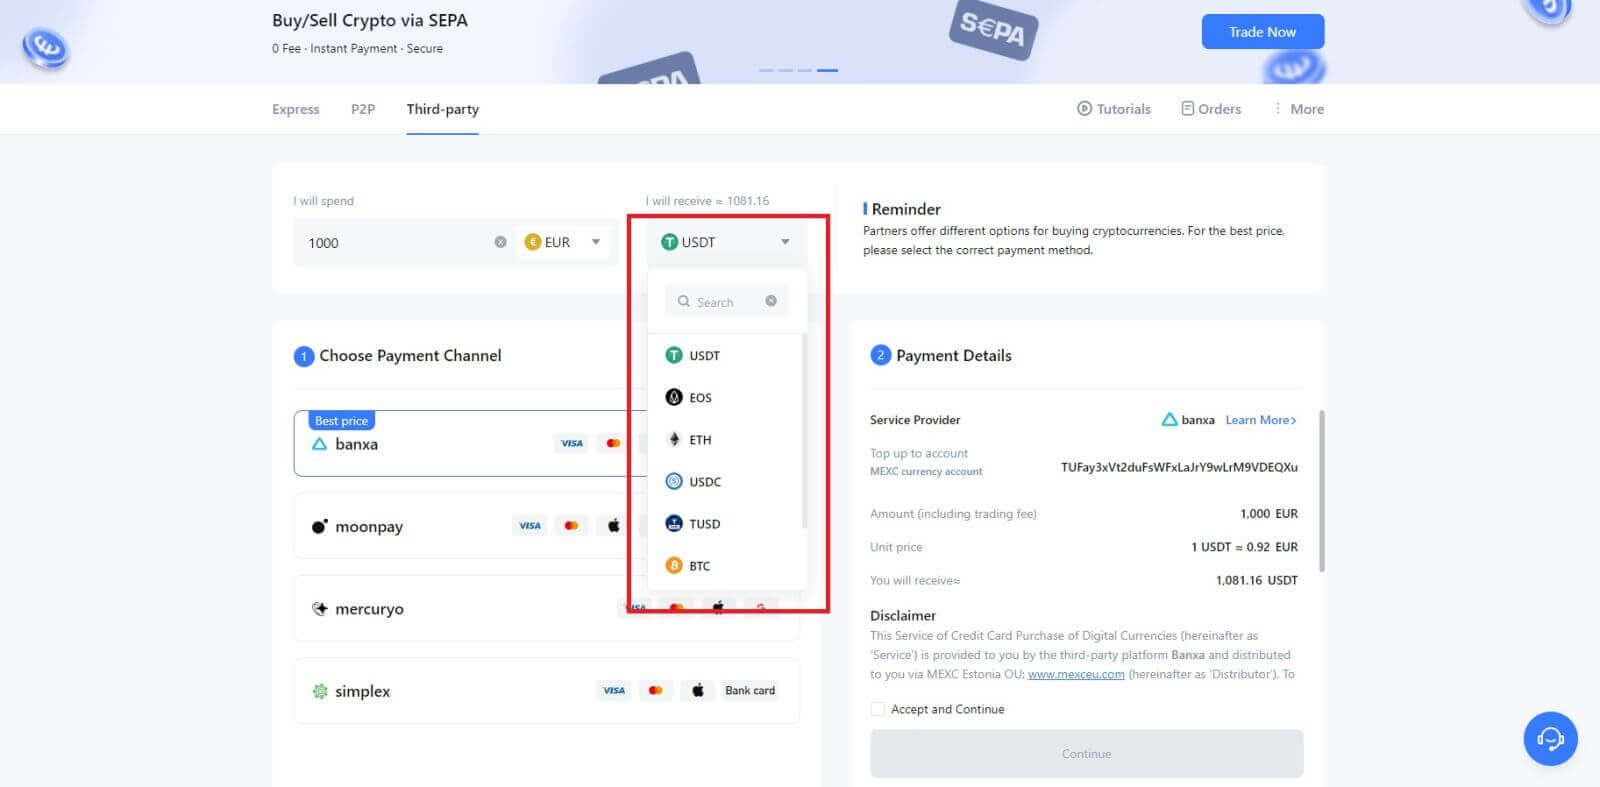
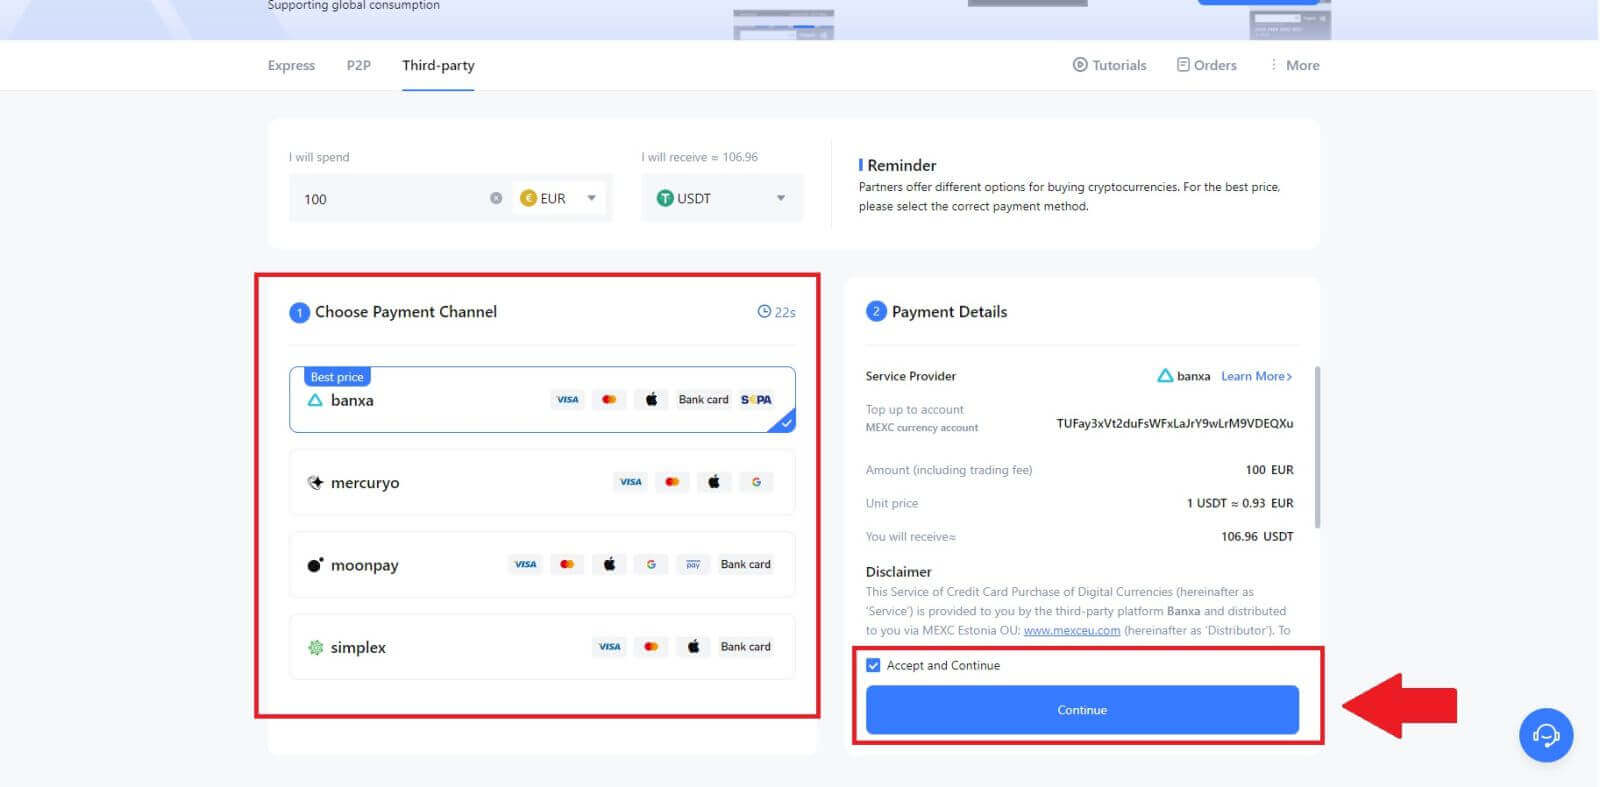
5. Choose your payment channel and you can verify the unit price in the Payment Details section.
Tick on the [Accept and Continue] and click [Continue]. You will be redirected to the Third-party service provider’s official webpage to continue with the purchase.
Buy Crypto via Third Party on MEXC (App)
1. Open your MEXC app, on the first page, tap [More].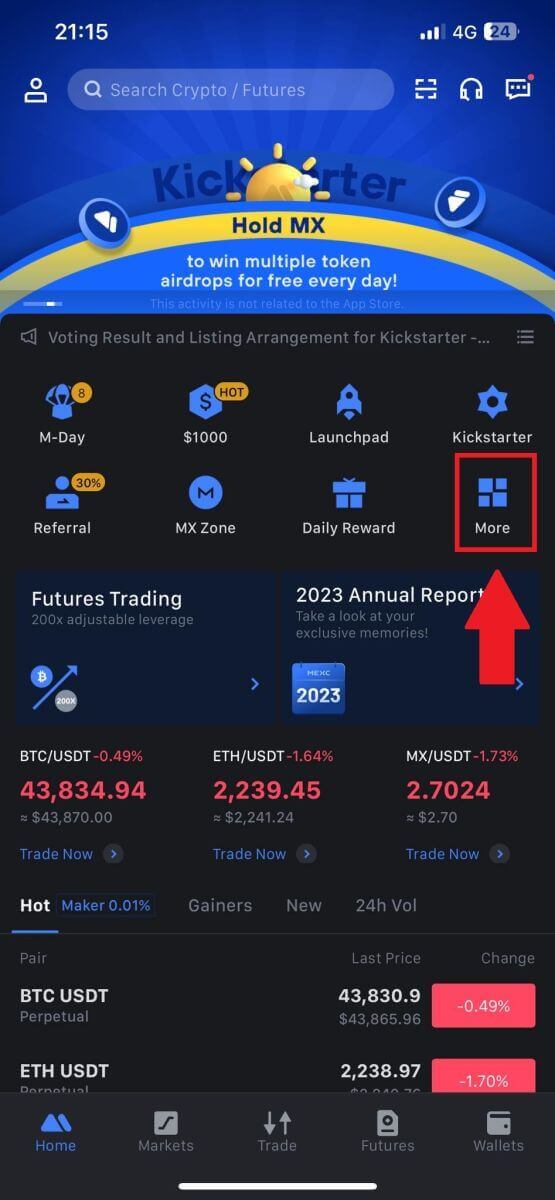
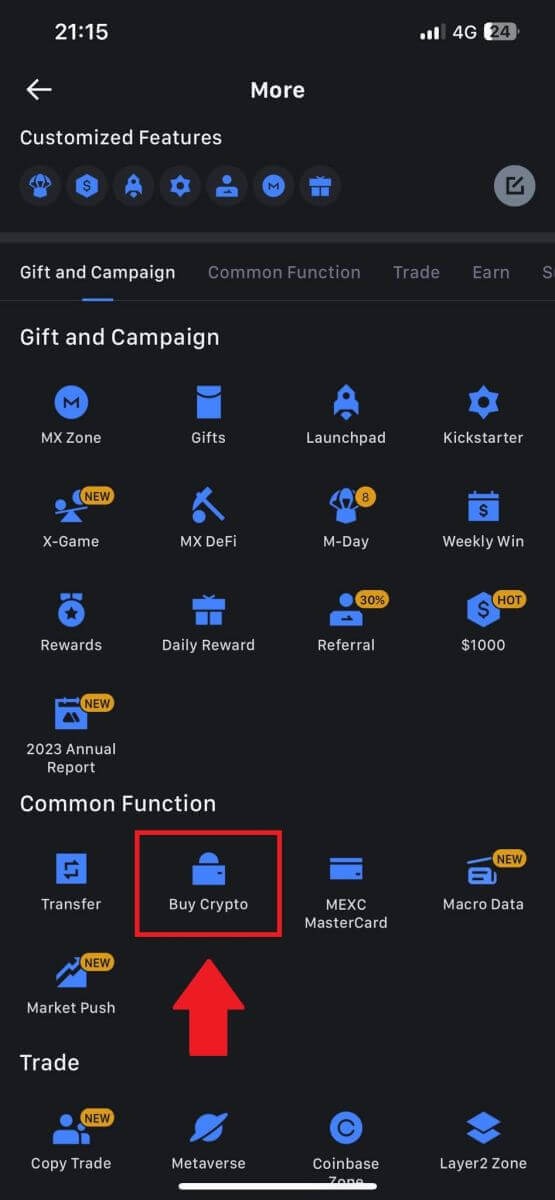
2. Tap on [Buy Crypto] to continue.
3. Choose your preferred Fiat Currency for the payment and enter the amount for your purchase.
Select the cryptocurrency you want to receive in your MEXC wallet
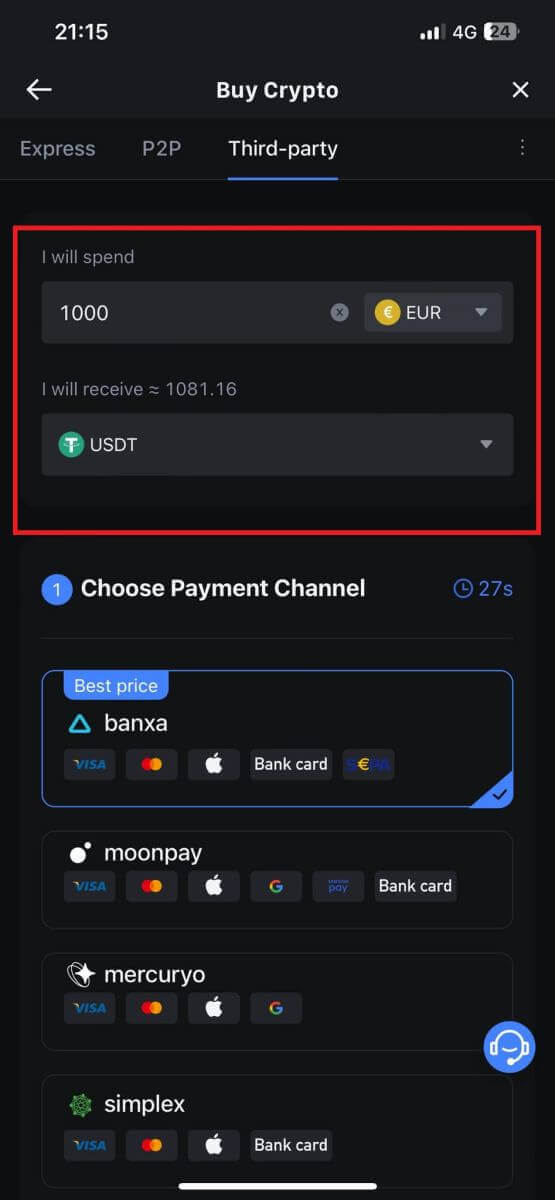
4. Choose your payment network and tap [Continue].
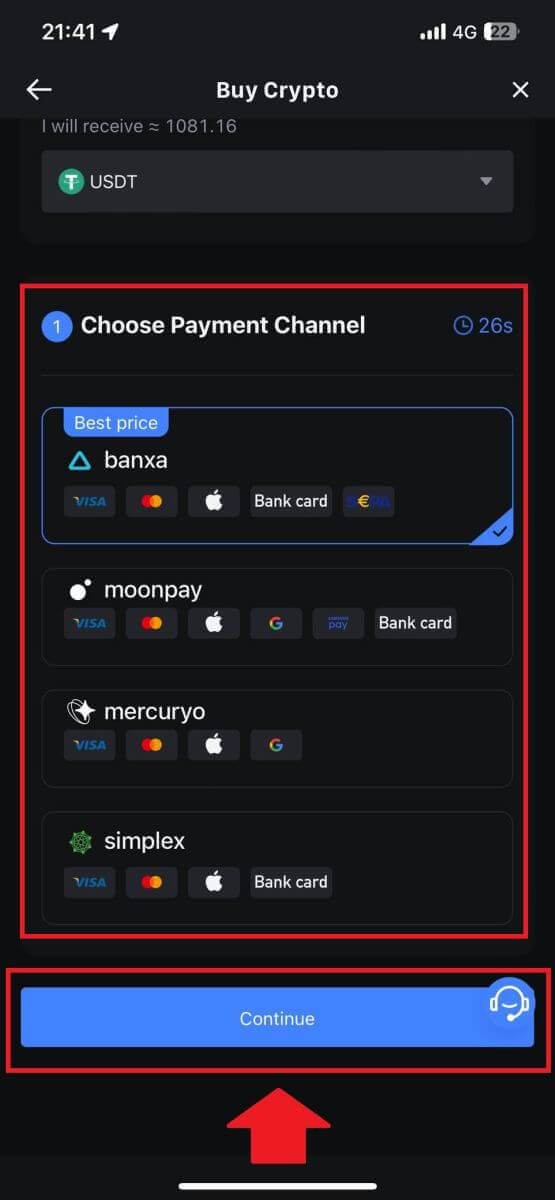
5. Review your details, tick on the [Accept and Continue] button and tap [Continue]. You will be redirected to the Third-party service provider’s official webpage to continue with the purchase.

How to Buy Crypto via P2P on MEXC
Buy Crypto via P2P on MEXC (Website)
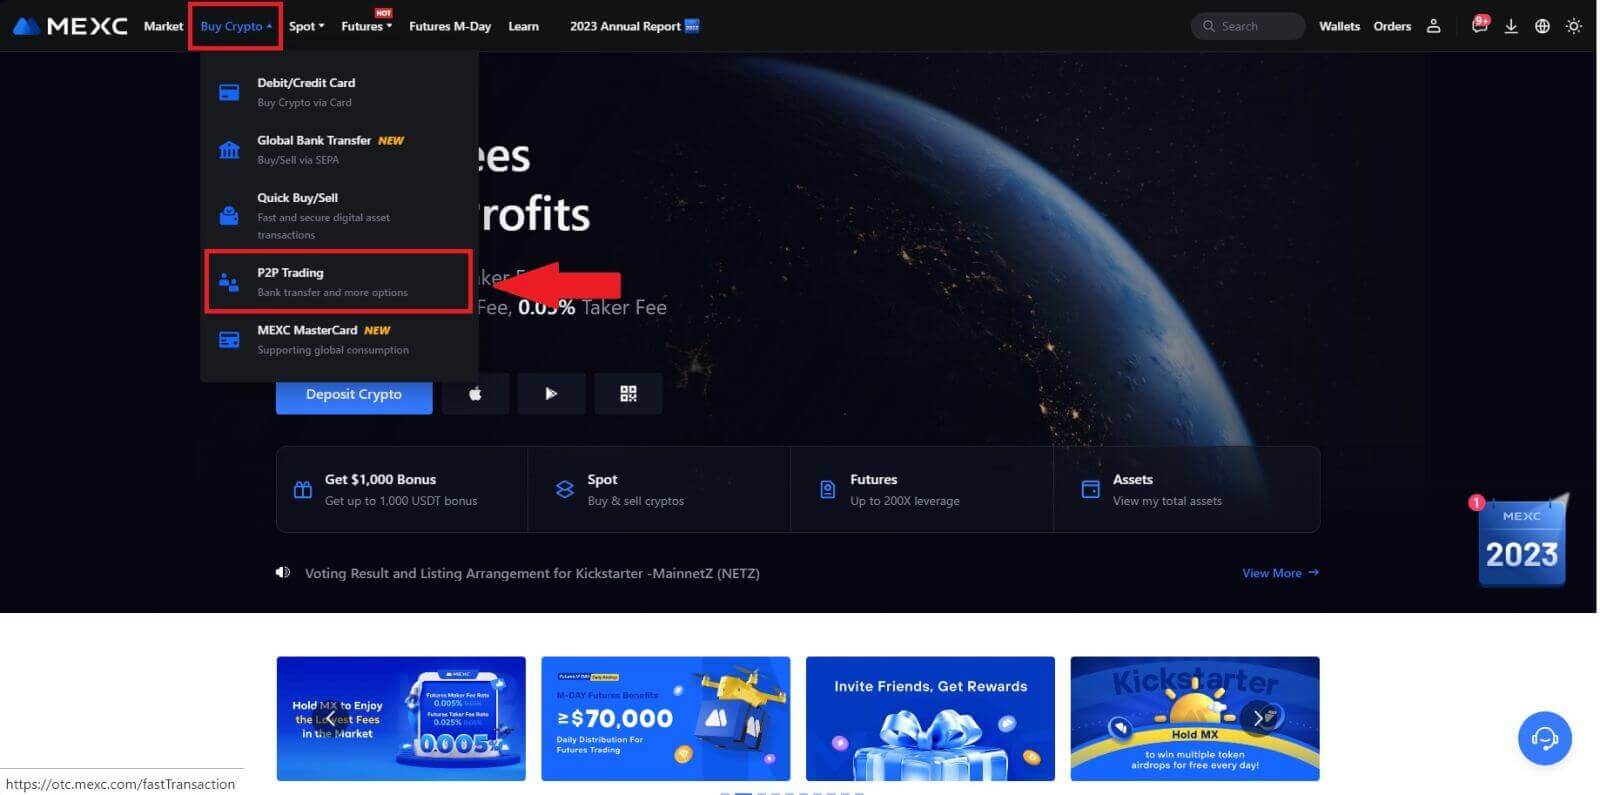
1. Log in to your MEXC, click [Buy Crypto], and select [P2P Trading].
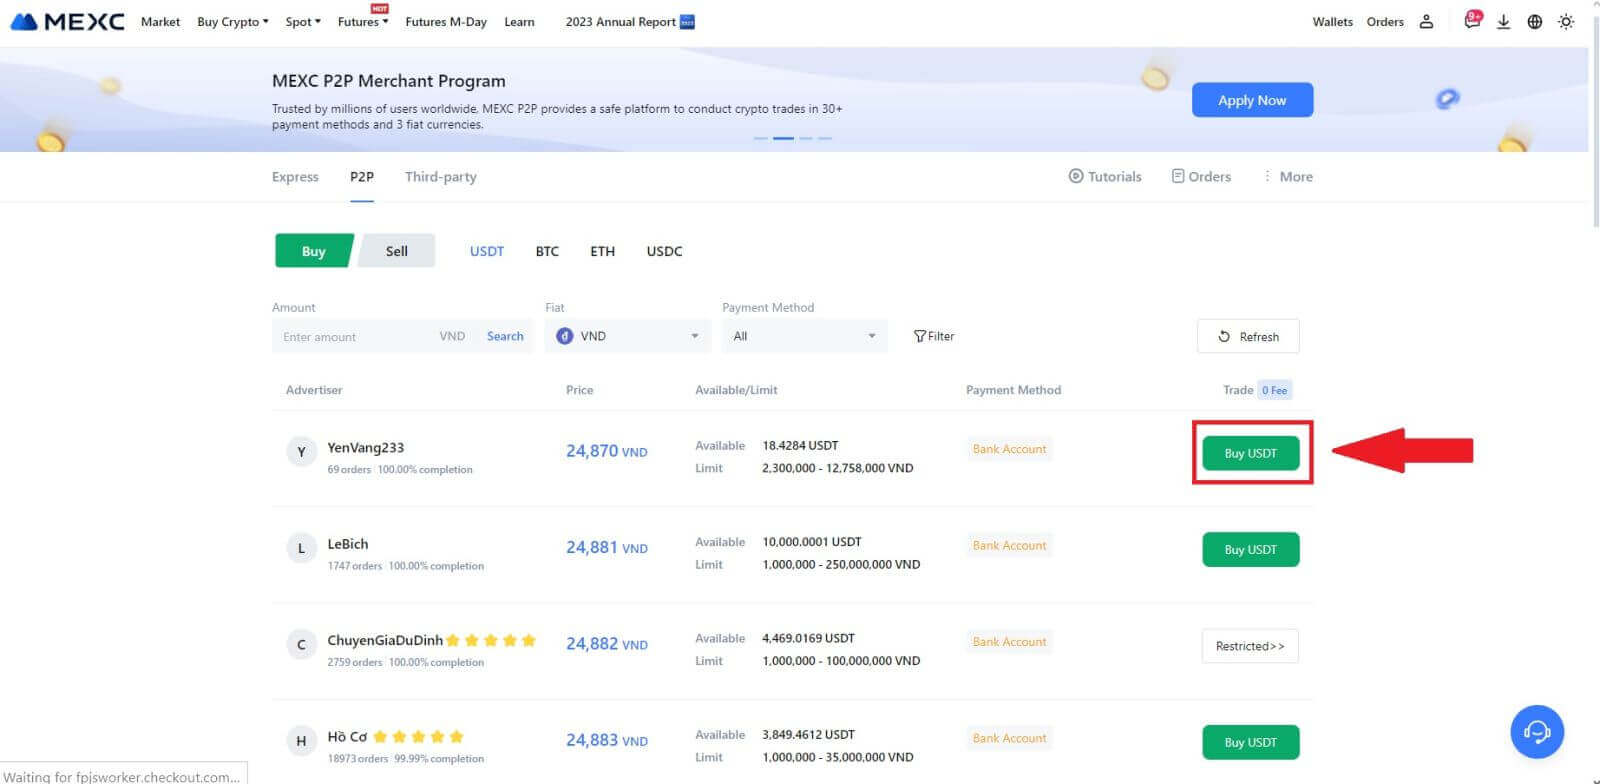
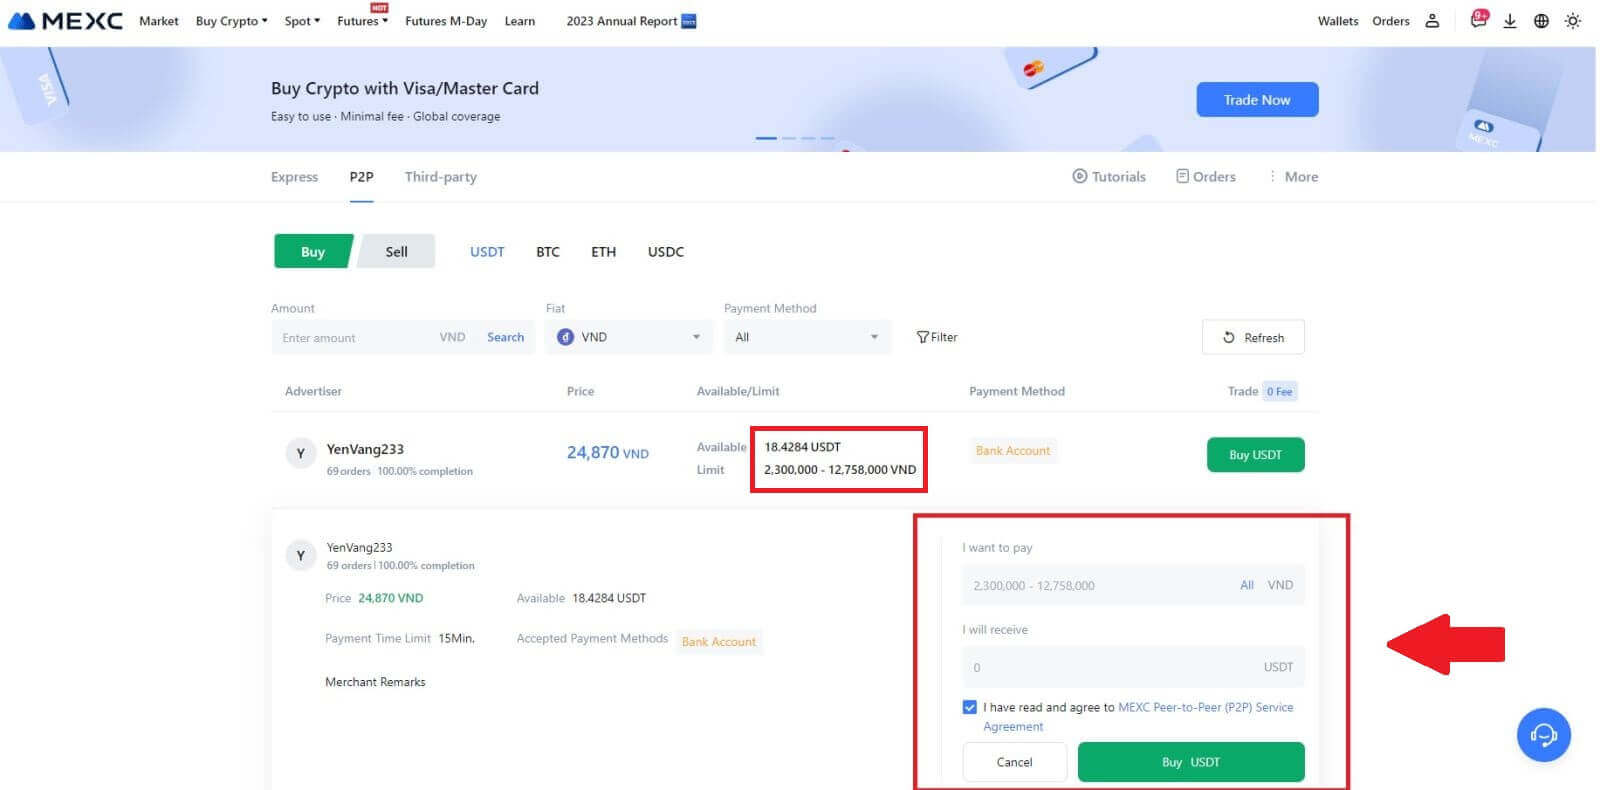
2. On the transaction page, select the merchant you want to trade with and click [Buy USDT].
3. Specify the amount of Fiat Currency you are willing to pay in the [I want to pay] column. Alternatively, you have the option to input the quantity of USDT you aim to receive in the [I will receive] column. The corresponding payment amount in Fiat Currency will be calculated automatically, or conversely, based on your input.
After following the aforementioned steps, kindly ensure to check the box indicating [I have read and agree to MEXC Peer-to-Peer (P2P) Service Agreement]. Click on [Buy USDT] and subsequently, you will be redirected to the Order page.
Note: Under the [Limit] and [Available] columns, P2P Merchants have provided details on the available cryptocurrencies for purchase. Additionally, the minimum and maximum transaction limits per P2P order, presented in fiat terms for each advertisement, are also specified.
4. Reaching the order page, you are granted a 15-minute window to transfer the funds to the P2P Merchant’s bank account. Prioritize reviewing the order details to confirm that the purchase aligns with your transaction requirements.
- Examine the payment information exhibited on the Order page and proceed to finalize the transfer to the P2P Merchant’s bank account.
- Take advantage of the Live Chat box for real-time communication with P2P Merchants, ensuring seamless interaction.
- After completing the fund transfer, kindly check the box labeled [Transfer Completed, Notify Seller].
Note: MEXC P2P requires users to manually transfer fiat currency from their online banking or payment app to the designated P2P Merchant after order confirmation, as automatic payment is not supported.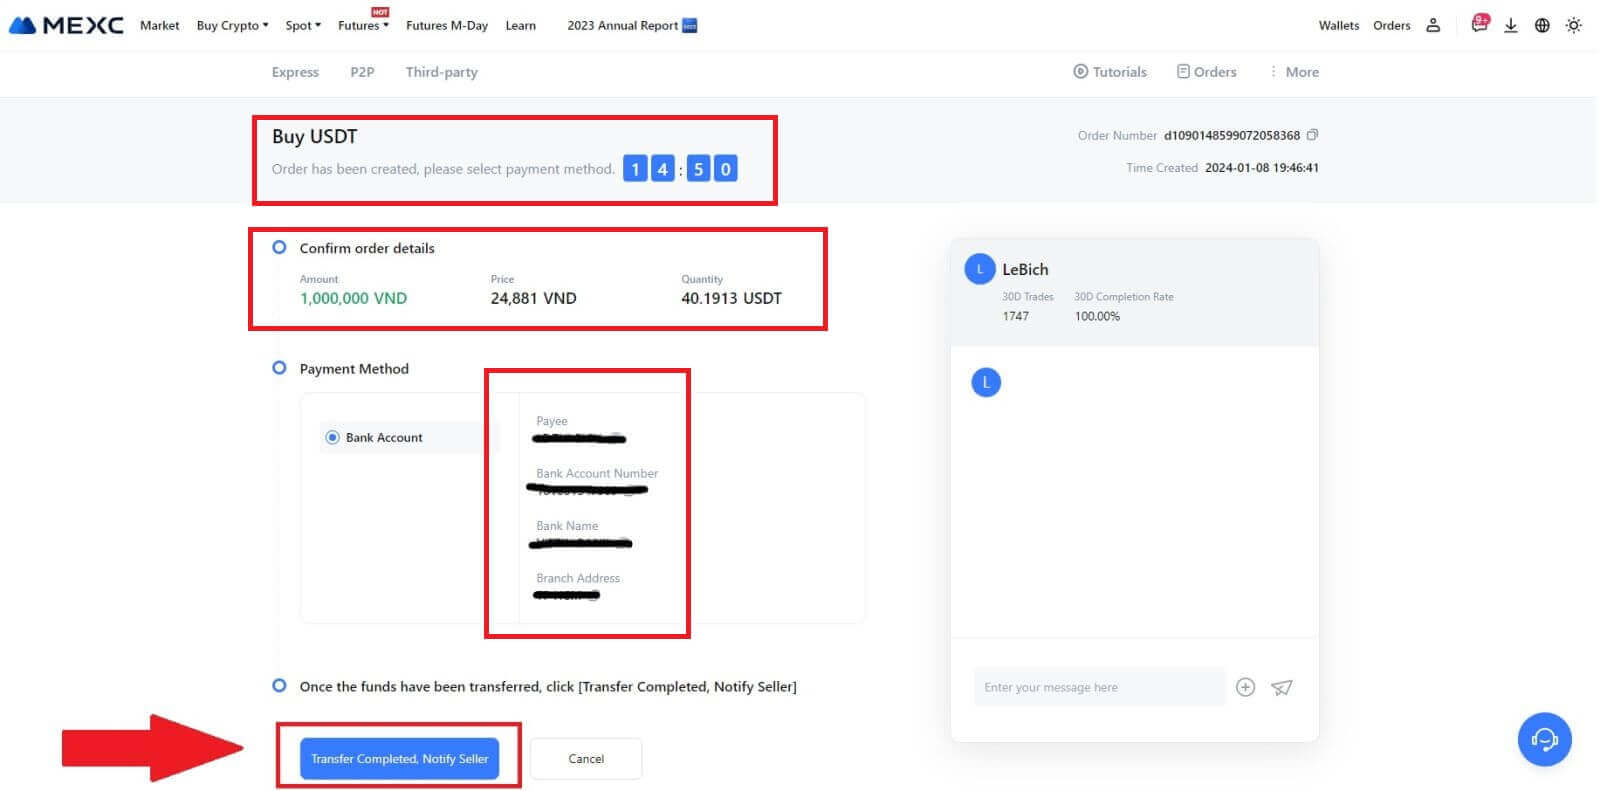
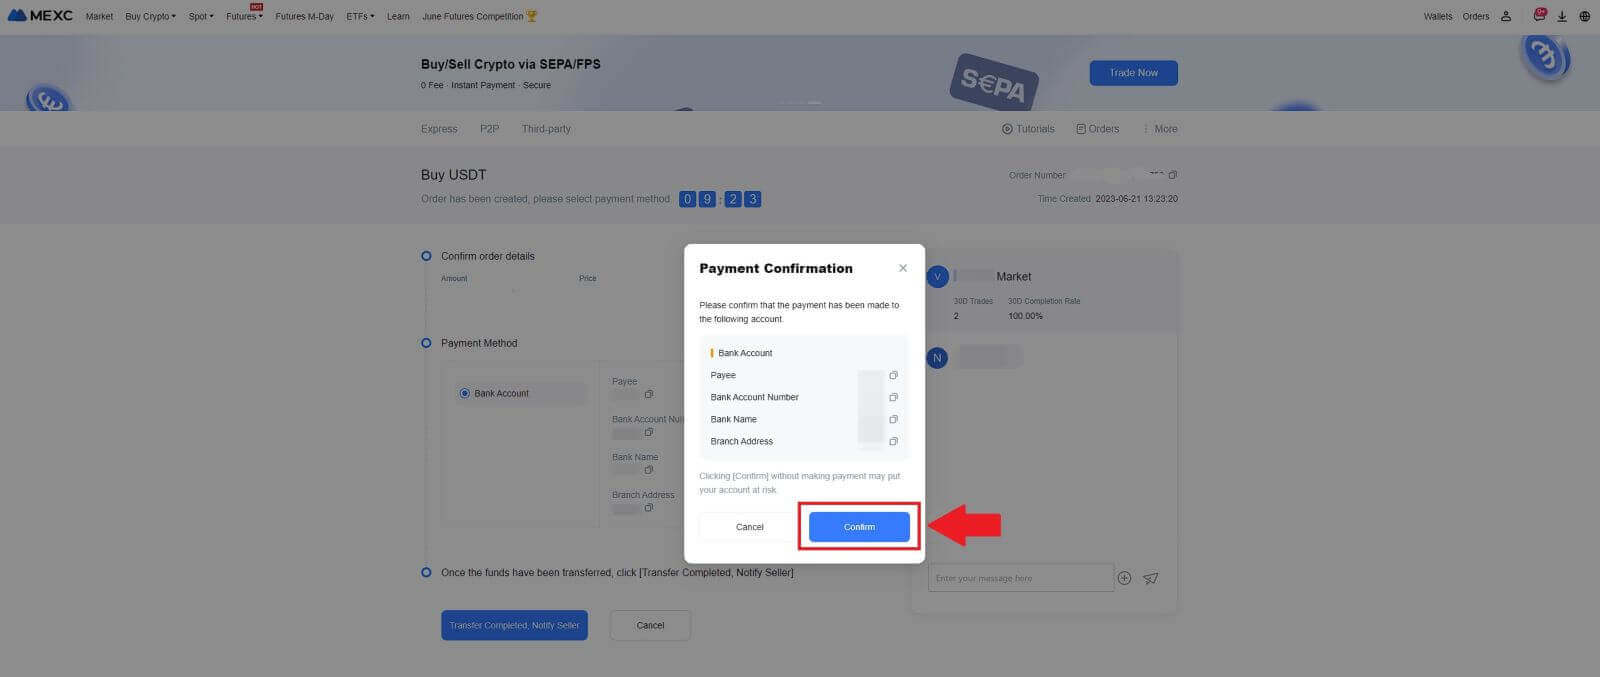
5. To proceed with the P2P buy order, simply click on [Confirm].
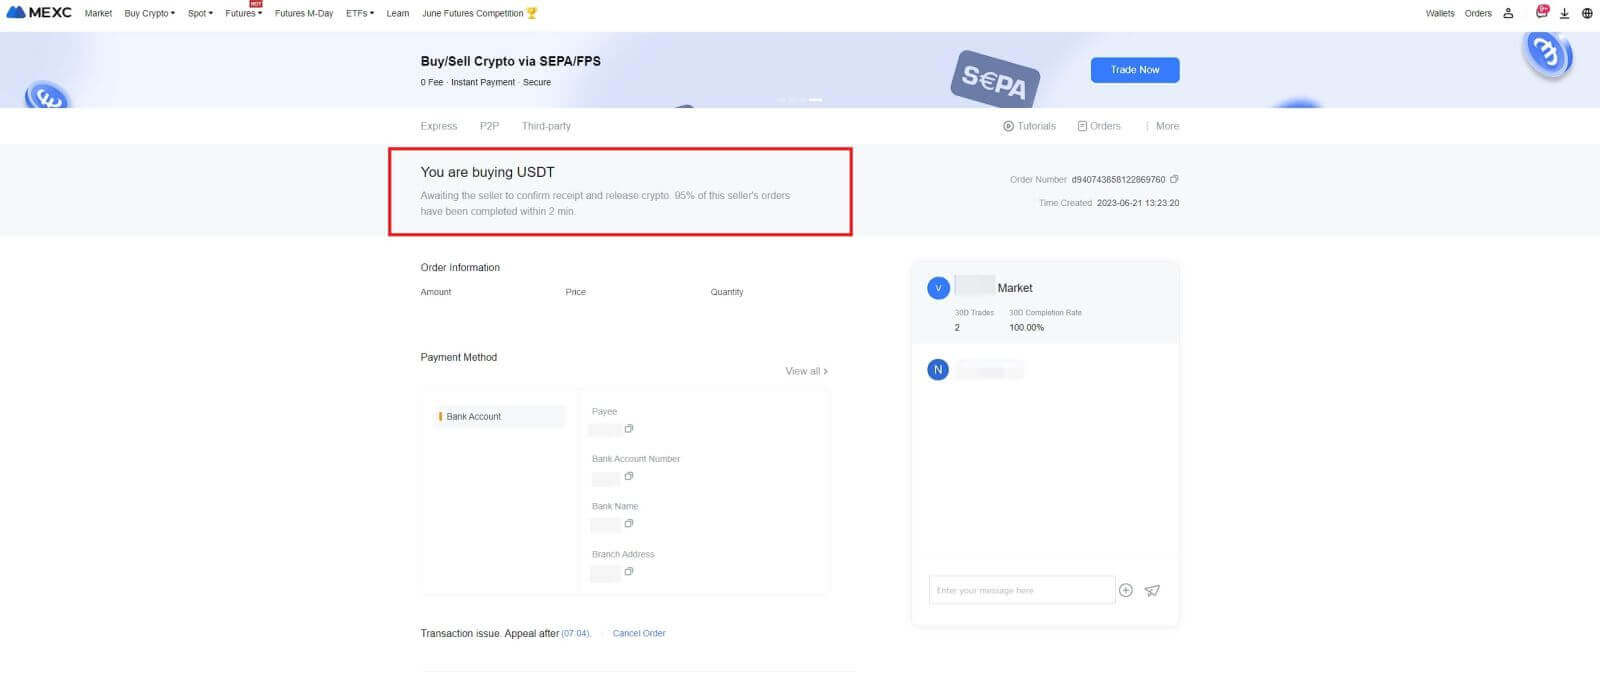
6. Please wait for the P2P Merchant to release the USDT and finalize the order.
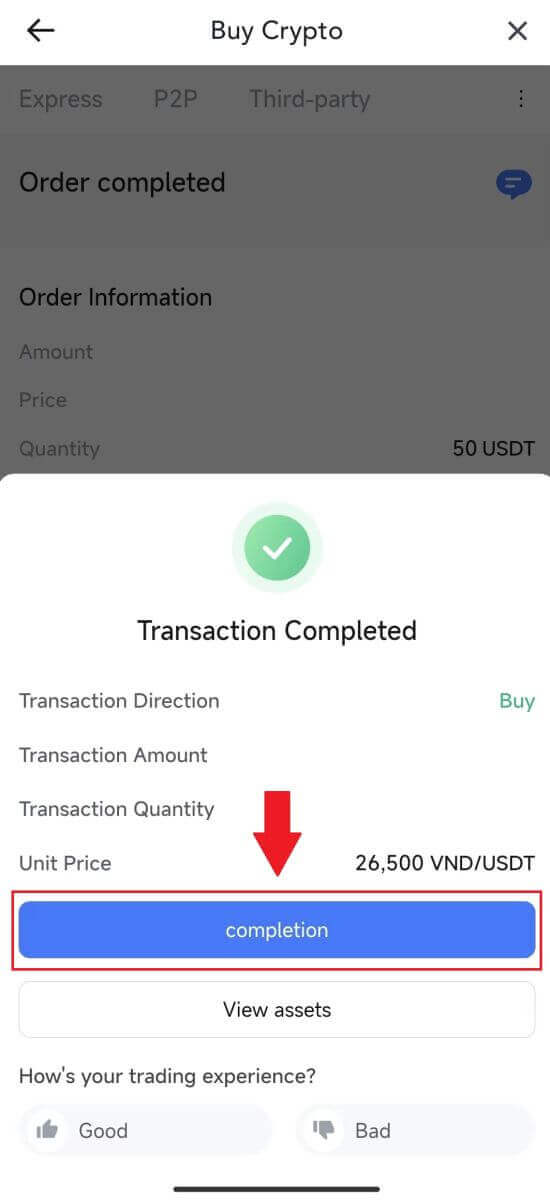
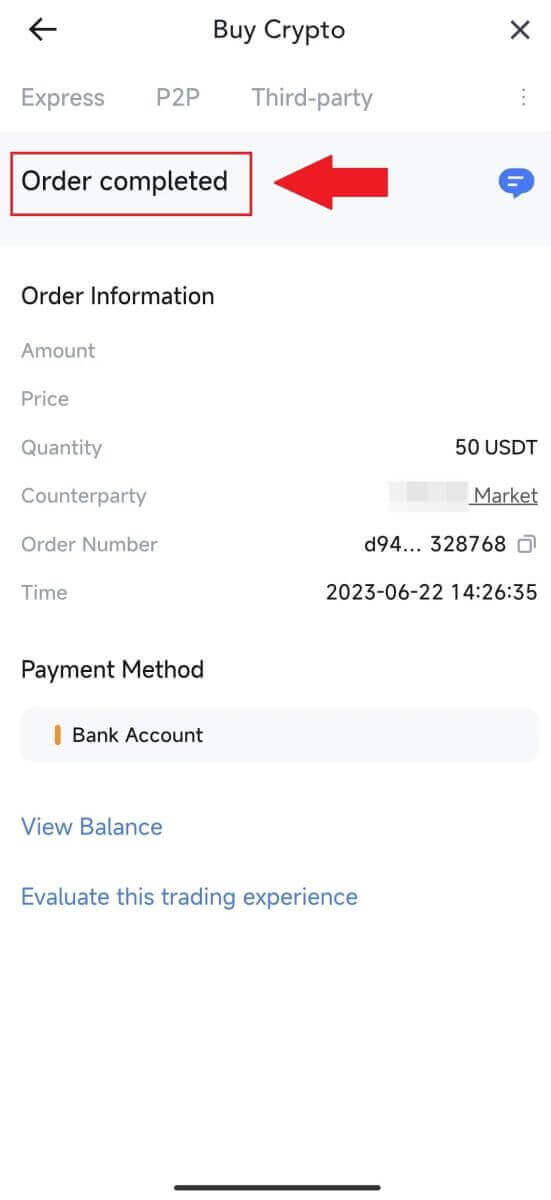
7. Congratulations! You have successfully completed the purchase of crypto through MEXC P2P.
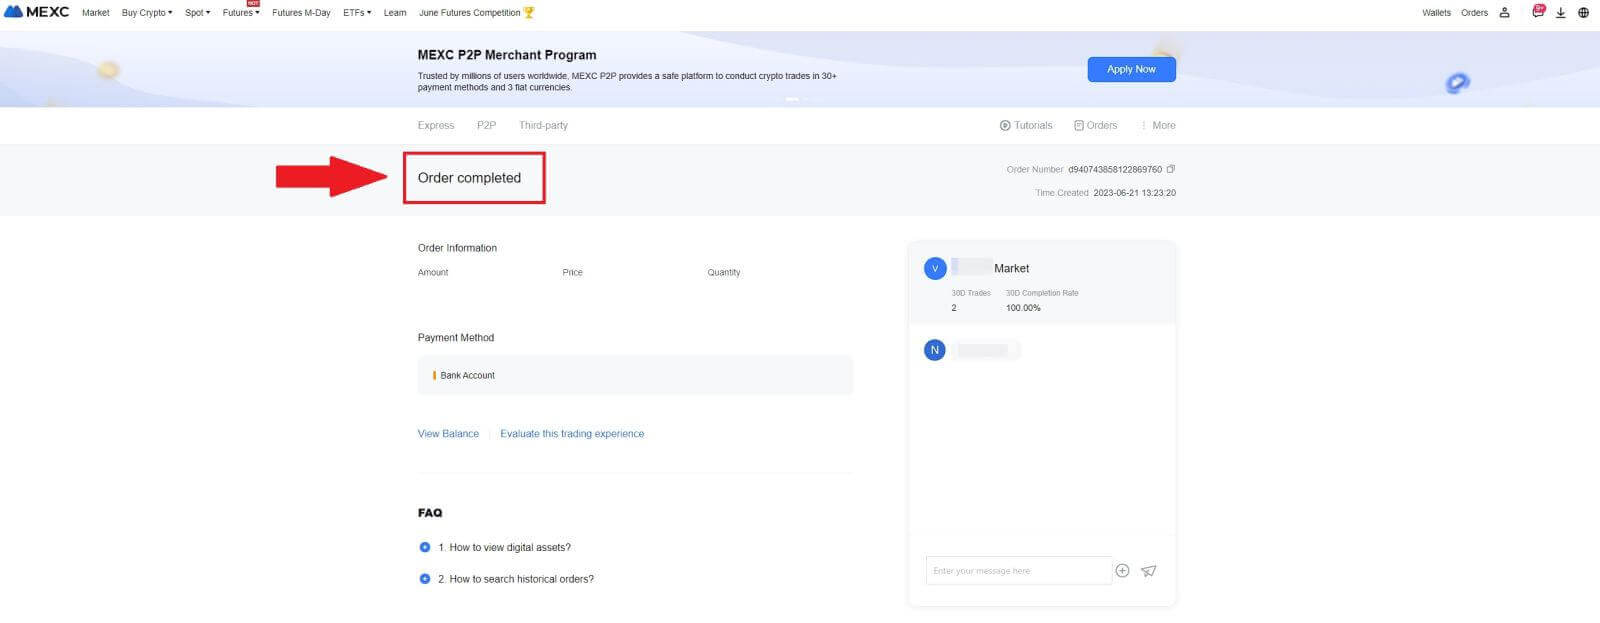
Buy Crypto via P2P on MEXC (App)
1. Open your MEXC app, on the first page, tap [More].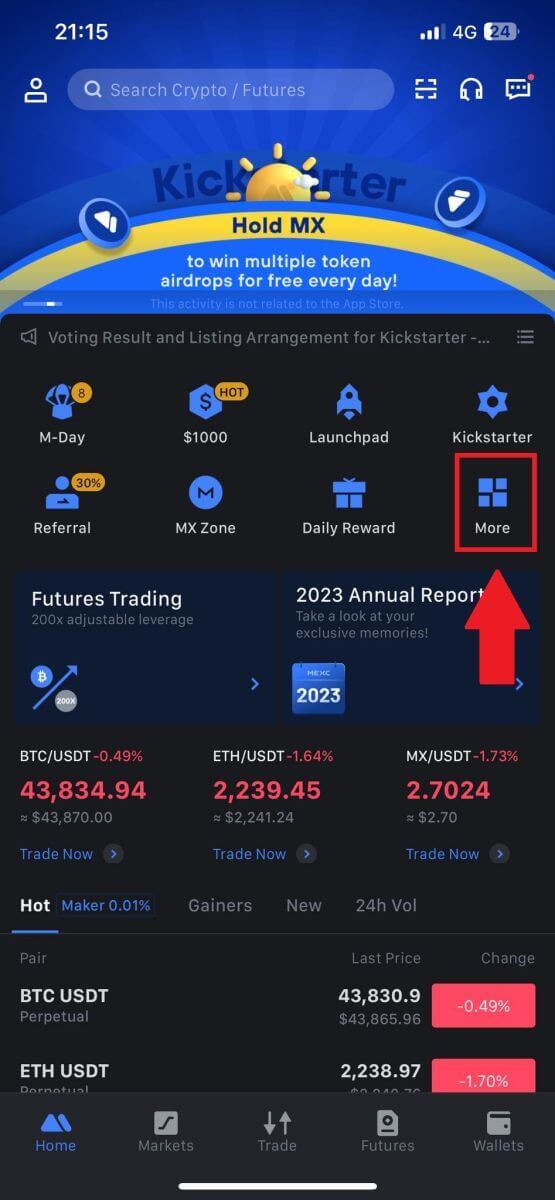
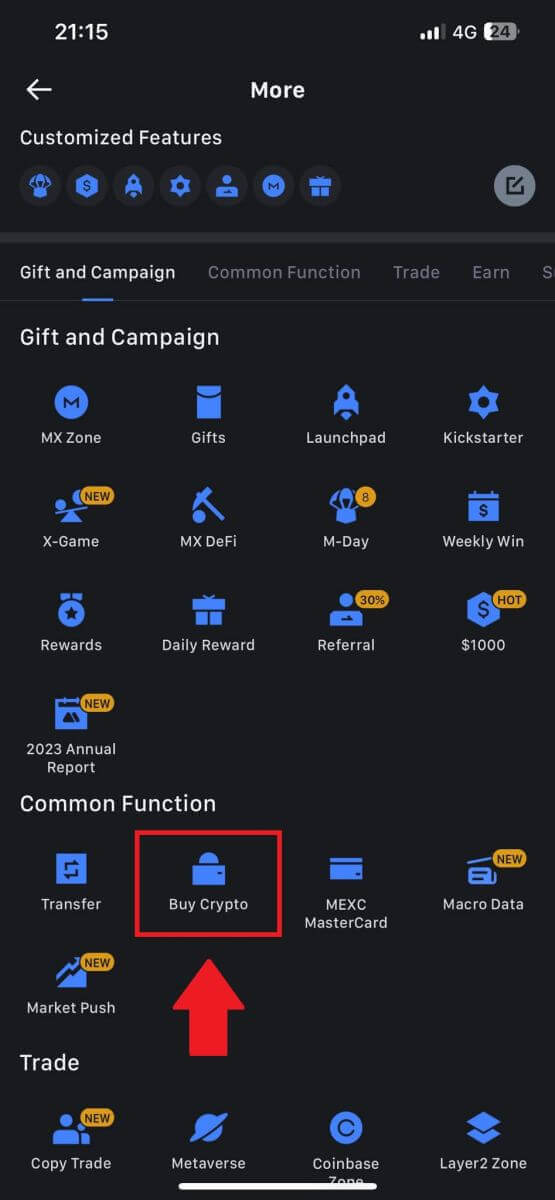
2. Tap on [Buy Crypto] to continue.
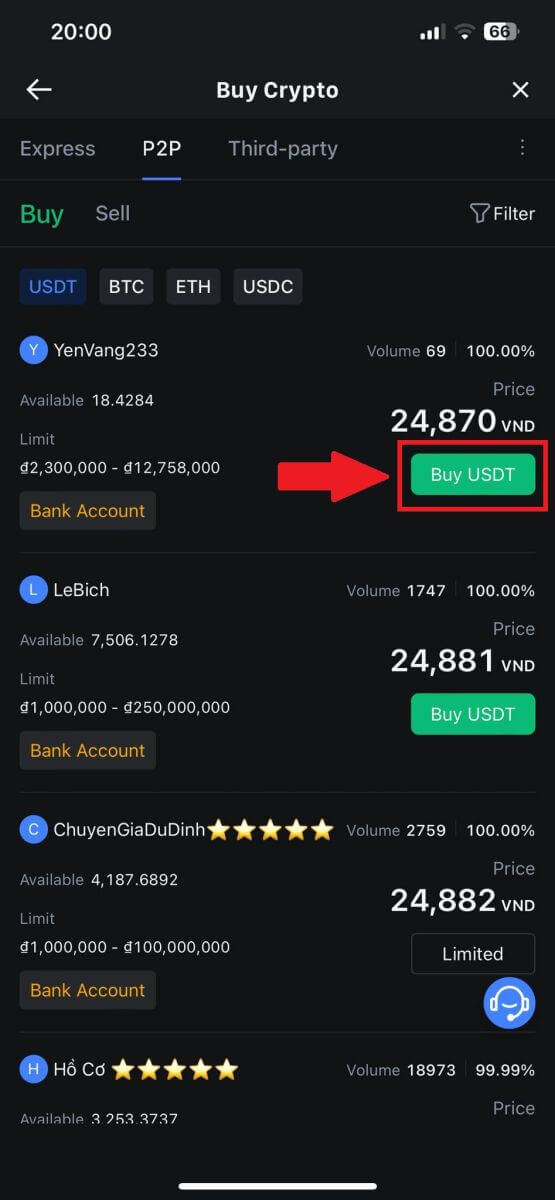
3. On the transaction page, select the merchant you want to trade with and click [Buy USDT].
4. Specify the amount of Fiat Currency you are willing to pay in the [I want to pay] column. Alternatively, you have the option to input the quantity of USDT you aim to receive in the [I will receive] column. The corresponding payment amount in Fiat Currency will be calculated automatically, or conversely, based on your input.
After following the aforementioned steps, kindly ensure to check the box indicating [I have read and agree to MEXC Peer-to-Peer (P2P) Service Agreement]. Click on [Buy USDT] and subsequently, you will be redirected to the Order page.
Note: Under the [Limit] and [Available] columns, P2P Merchants have provided details on the available cryptocurrencies for purchase. Additionally, the minimum and maximum transaction limits per P2P order, presented in fiat terms for each advertisement, are also specified.
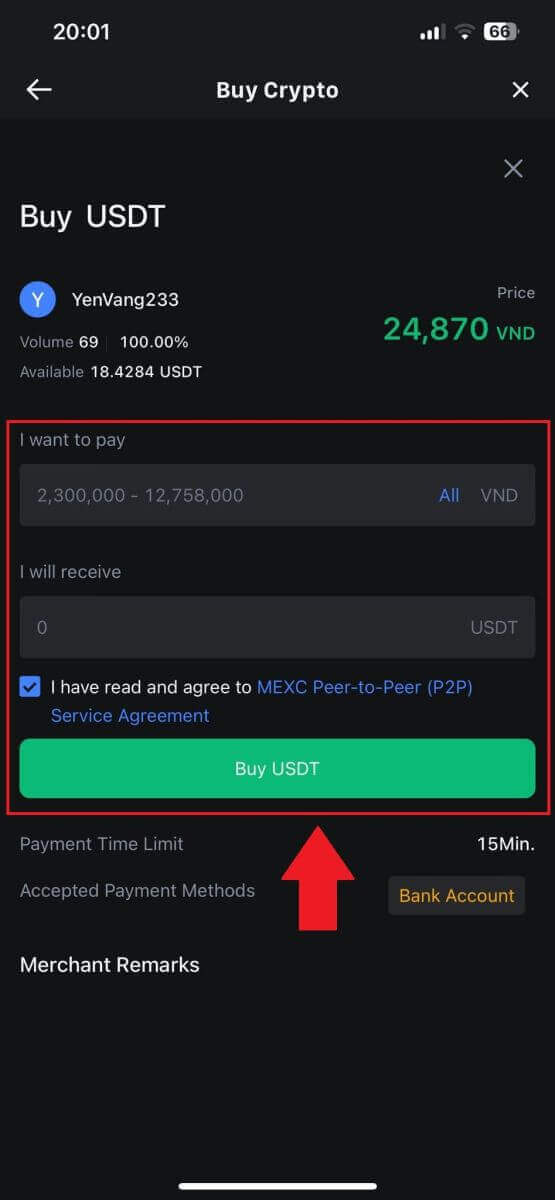
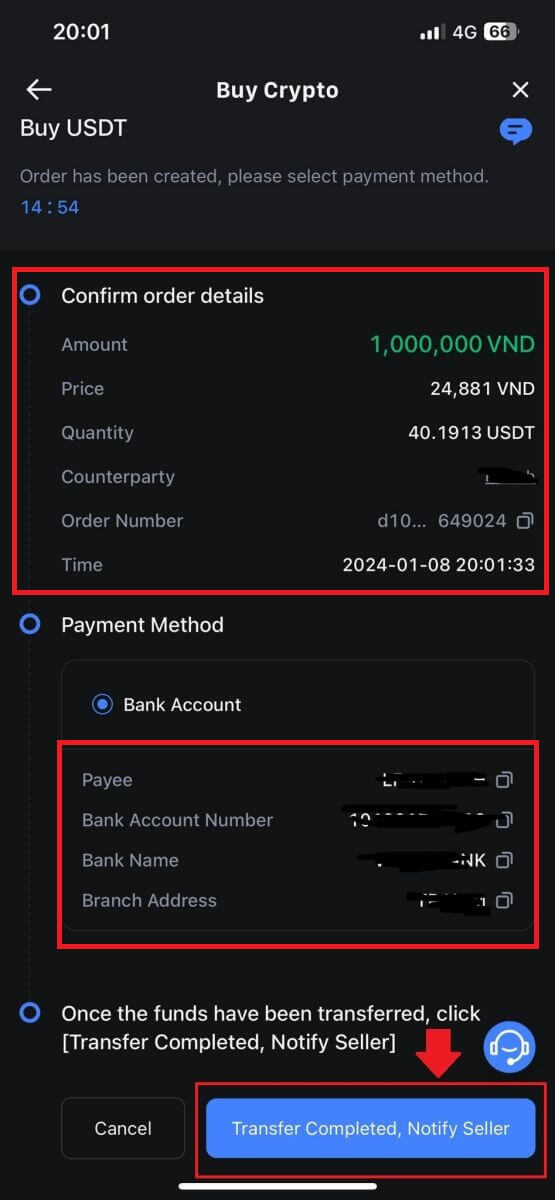
5. Please review the [order details] to ensure that the purchase aligns with your transaction requirements.
- Take a moment to examine the payment information displayed on the Order page and proceed to finalize the transfer to the P2P Merchant’s bank account.
- Take advantage of the Live Chat box for real-time communication with P2P Merchants, ensuring seamless interaction
- After completing the payment, click [Transfer Completed, Notify Seller].
- The merchant will soon confirm the payment, and the cryptocurrency will be transferred to your account.
Note: MEXC P2P requires users to manually transfer fiat currency from their online banking or payment app to the designated P2P Merchant after order confirmation, as automatic payment is not supported.
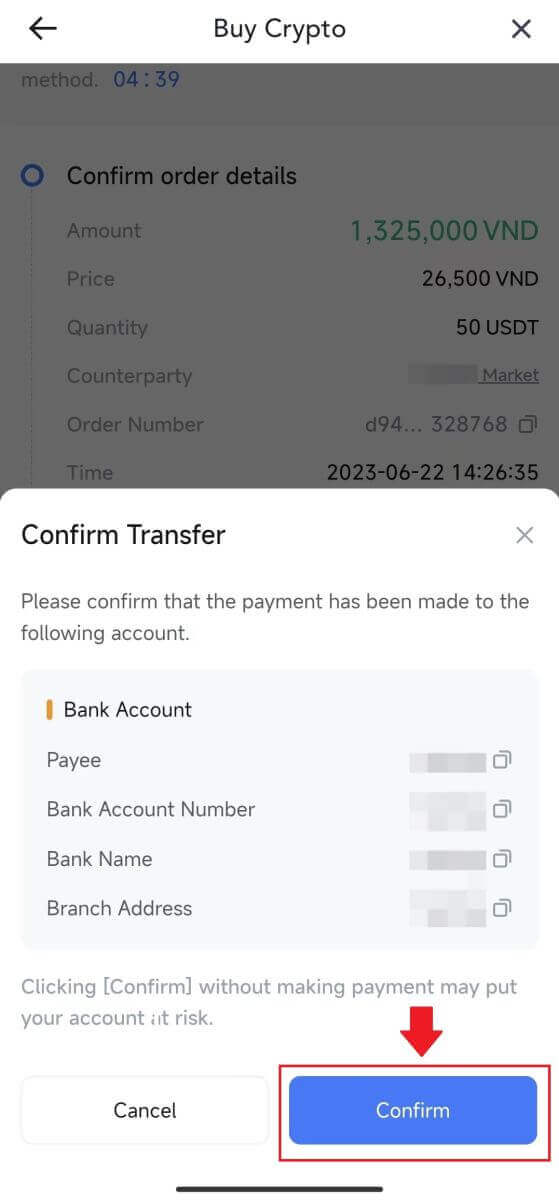
6. To proceed with the P2P buy order, simply click on [Confirm].
7. Please wait for the P2P Merchant to release the USDT and finalize the order.
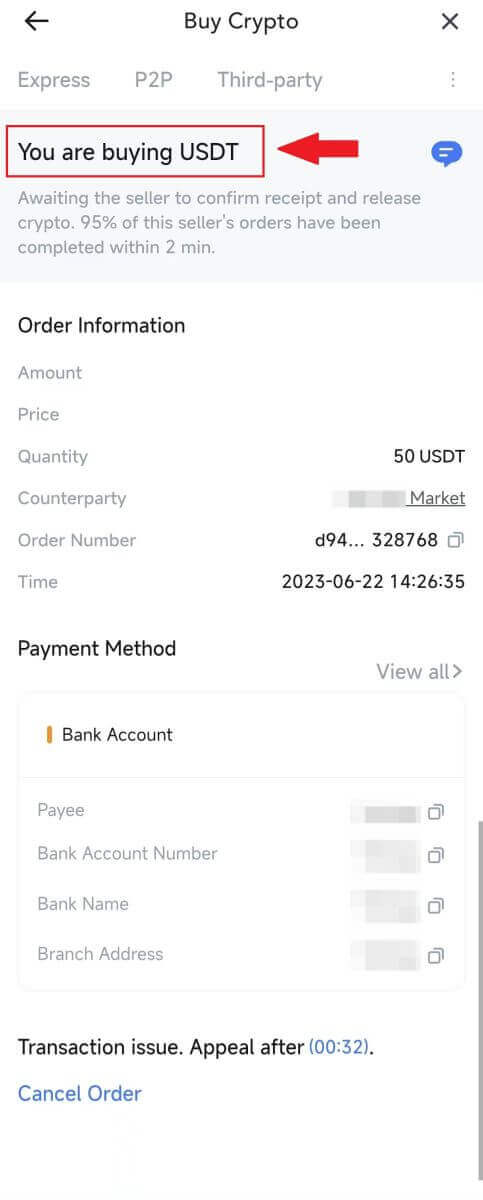
8. Congratulations! You have successfully completed the purchase of crypto through MEXC P2P.
How to Deposit on MEXC
Deposit Crypto on MEXC (Website)
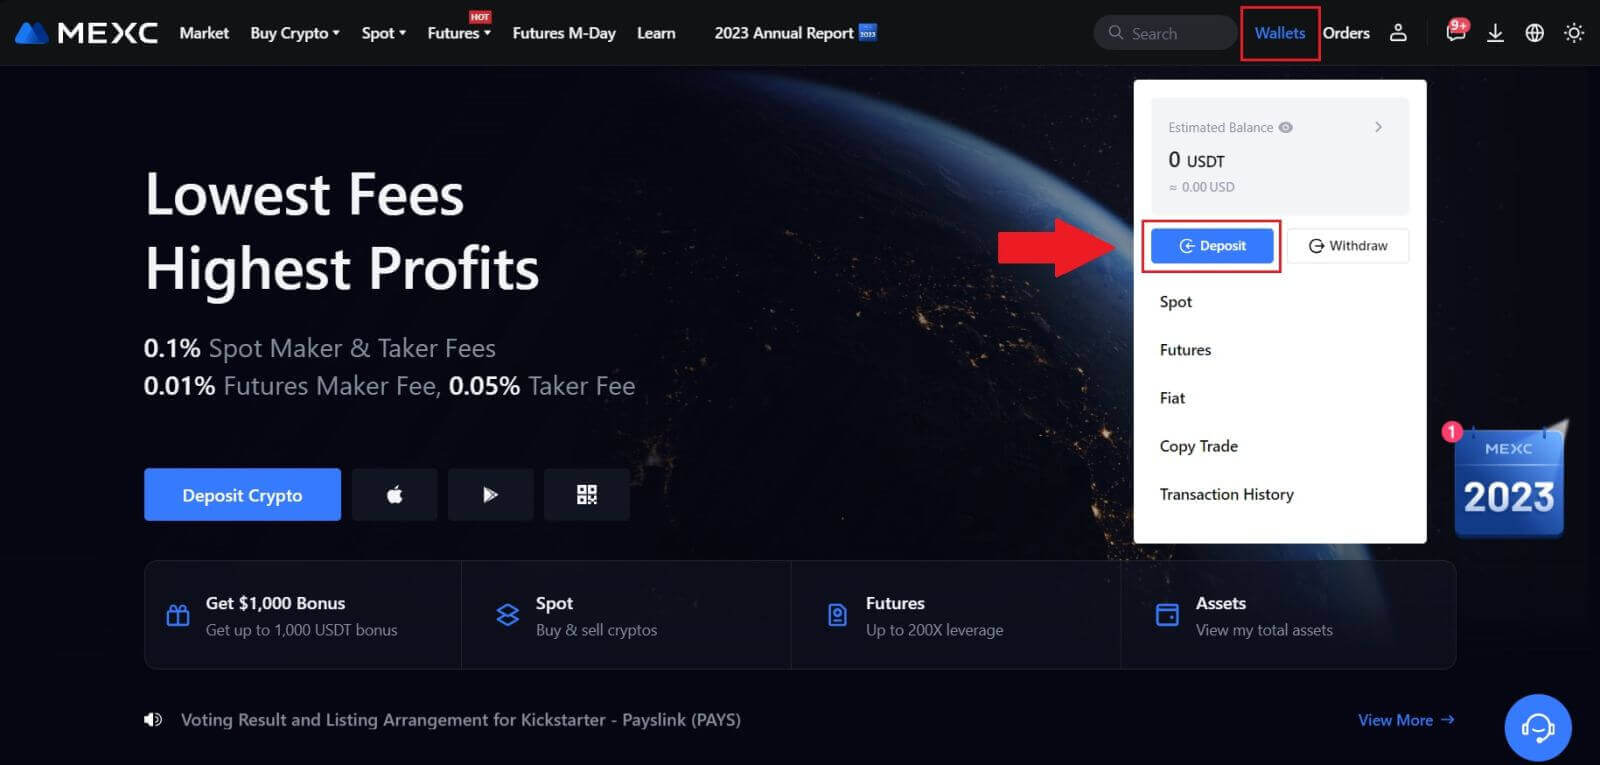
1. Log in to your MEXC, click on [Wallets] and select [Deposit].
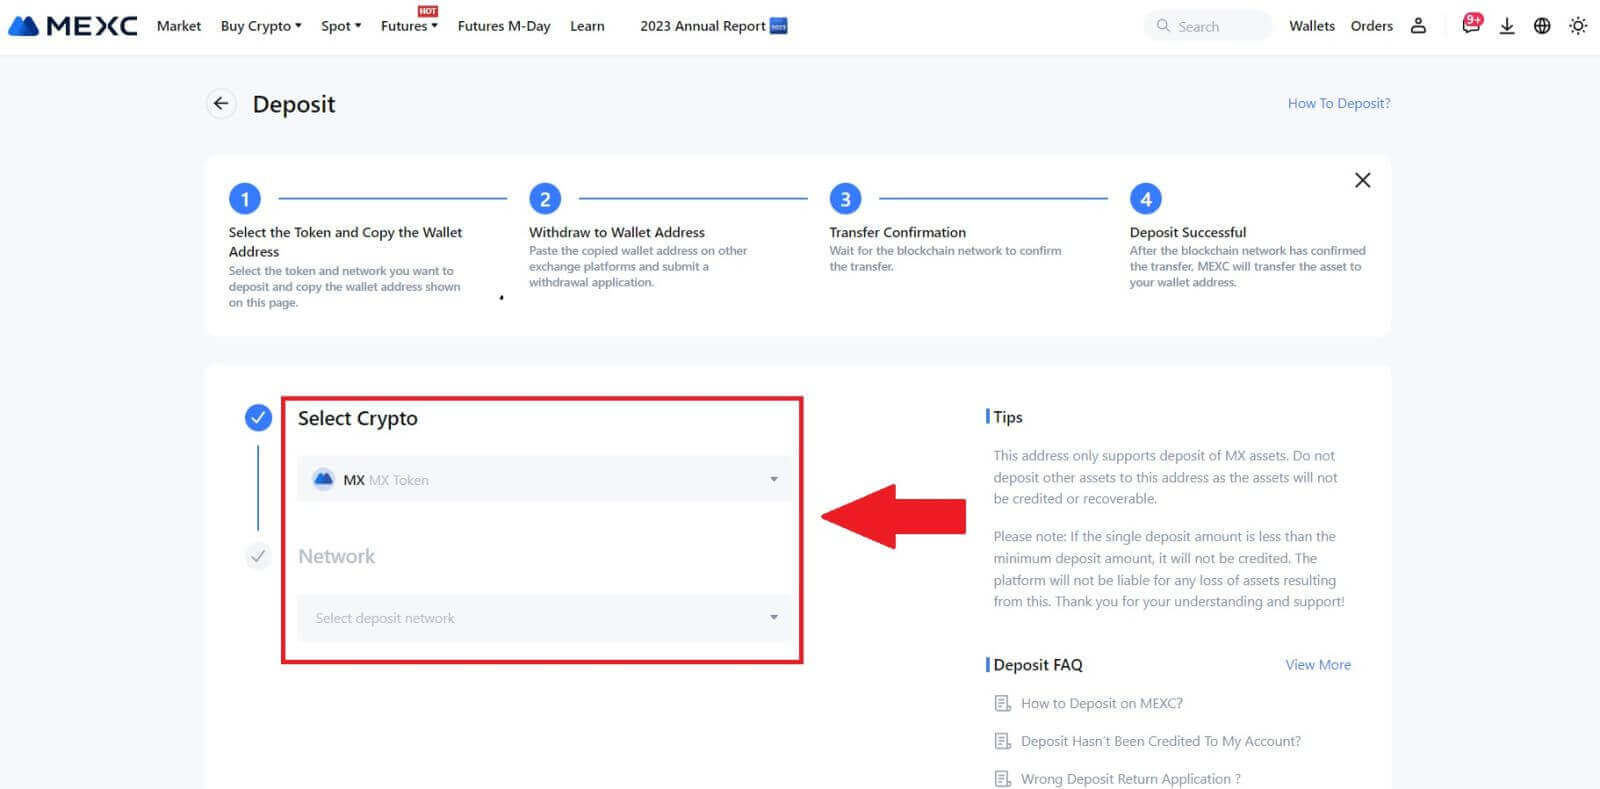
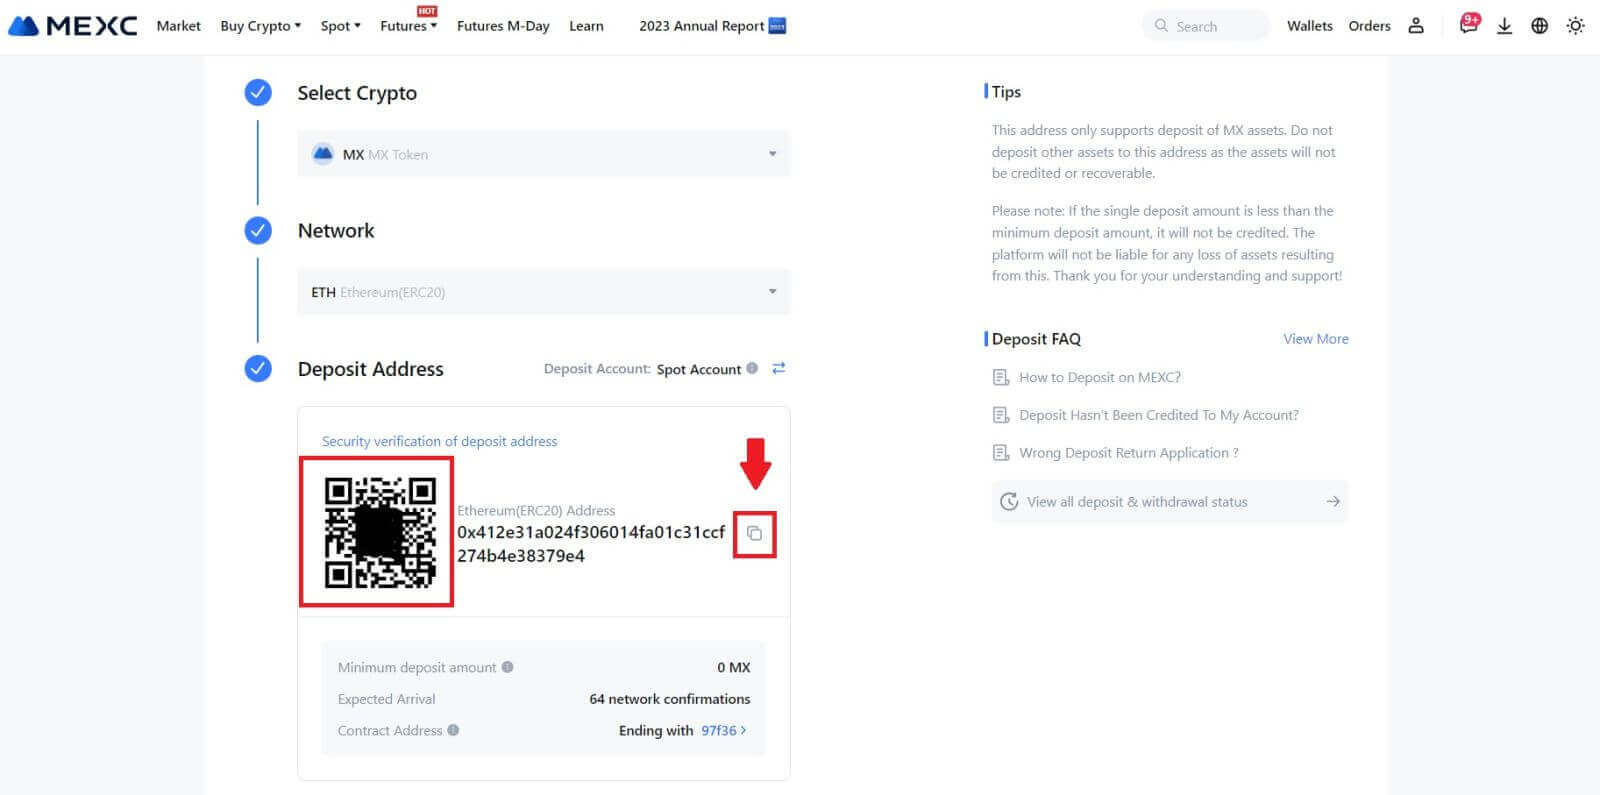
2. Select the cryptocurrency that you want to deposit and choose your network. Here, we using MX as an example.
Note: Different networks have different transaction fees. You can select a network with lower fees for your withdrawals.
3. Click the copy button or scan the QR code to obtain the deposit address. Paste this address into the withdrawal address field on the withdrawal platform. Follow the provided instructions on the withdrawal platform to initiate the withdrawal request.
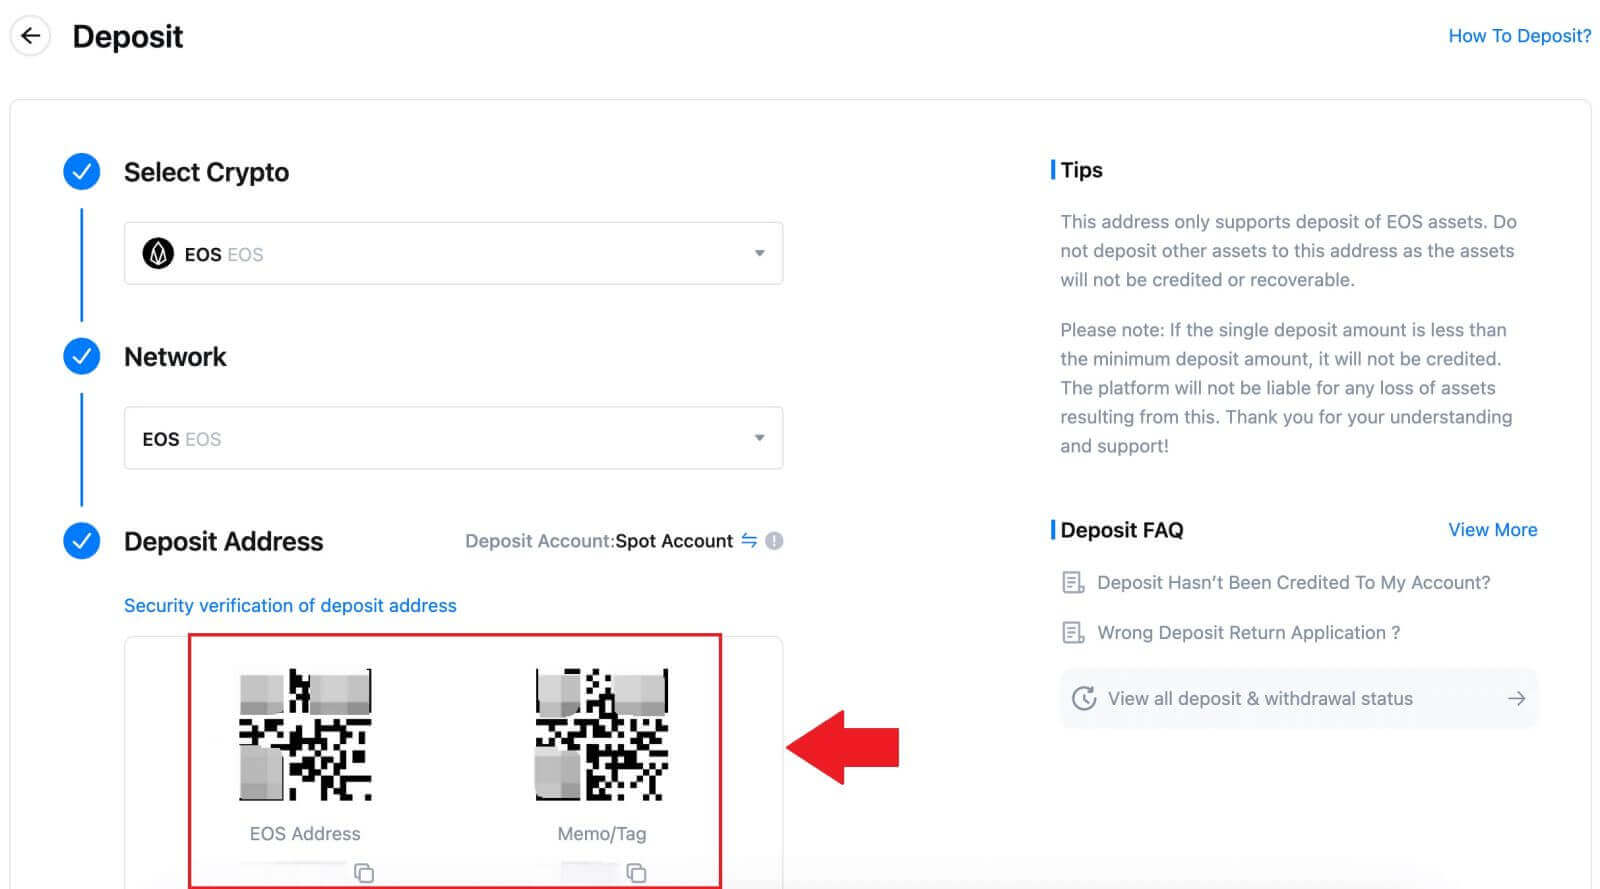
For certain networks like EOS, remember to include a Memo along with the address when making deposits. Without the Memo, your address may not be detected.
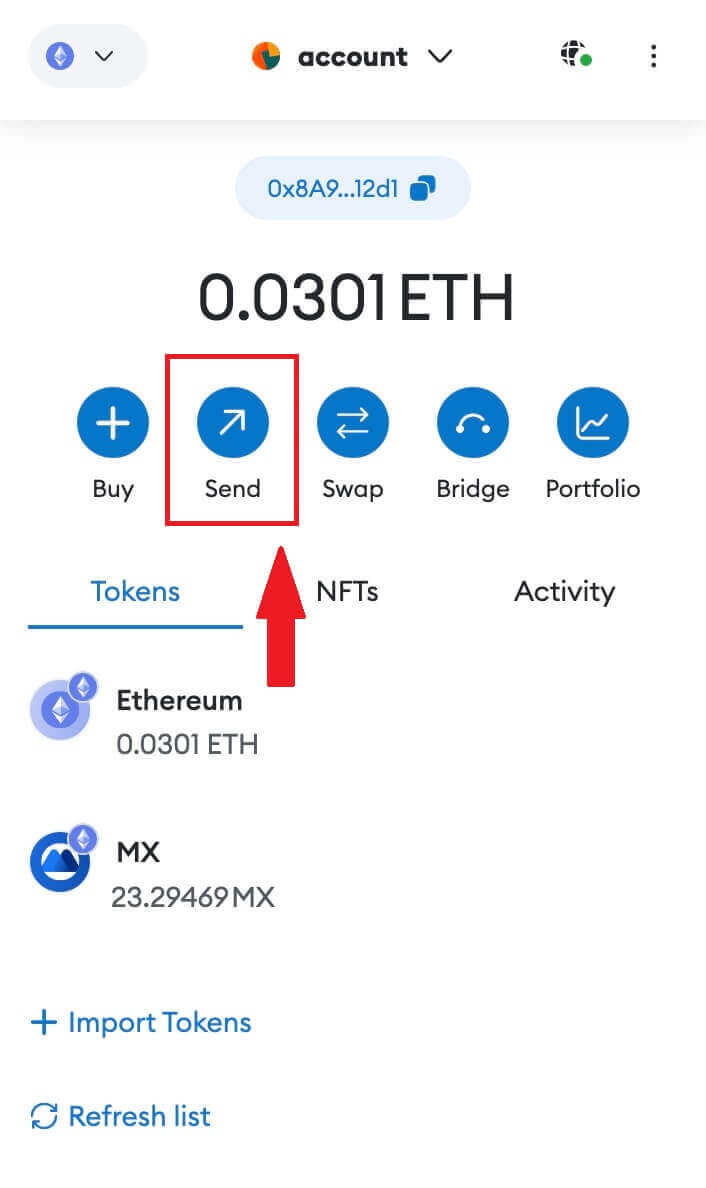
4. Let’s use MetaMask wallet as an example to demonstrate how to withdraw MX Token to the MEXC platform.
In your MetaMask wallet, select [Send].
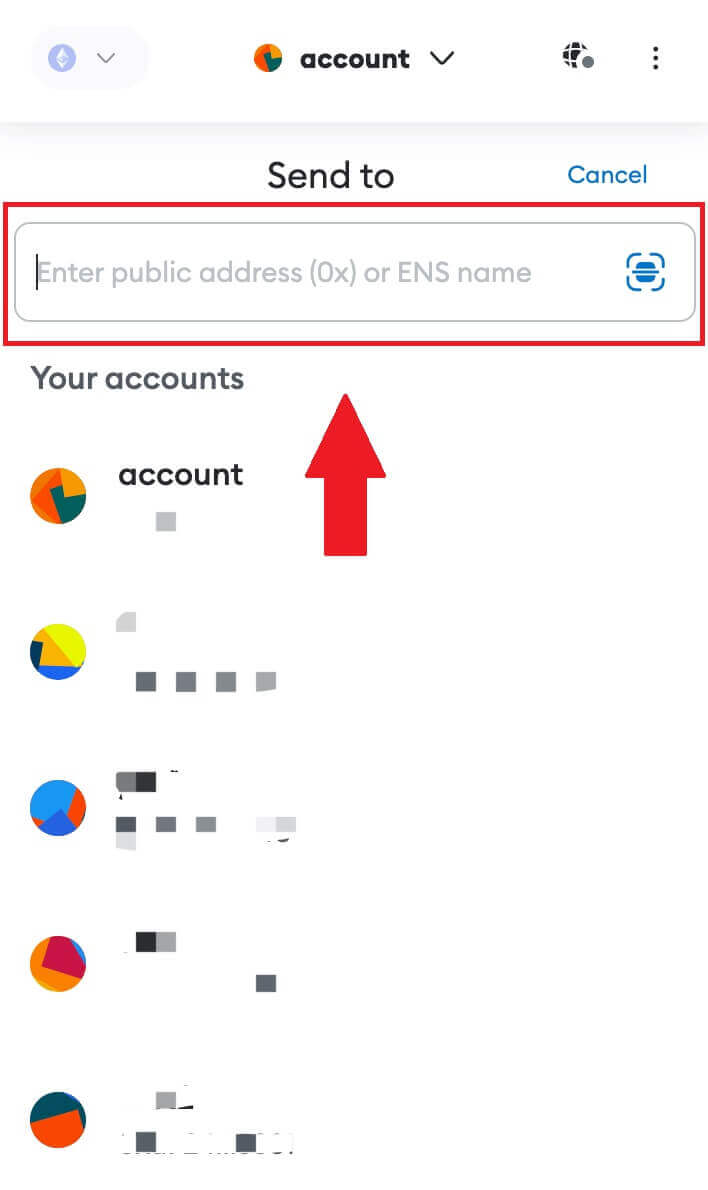
 5. Copy and paste the deposit address into the withdrawal address field in MetaMask. Make sure to choose the same network as your deposit address.
6. Enter the amount you wish to withdraw, then click on [Next].
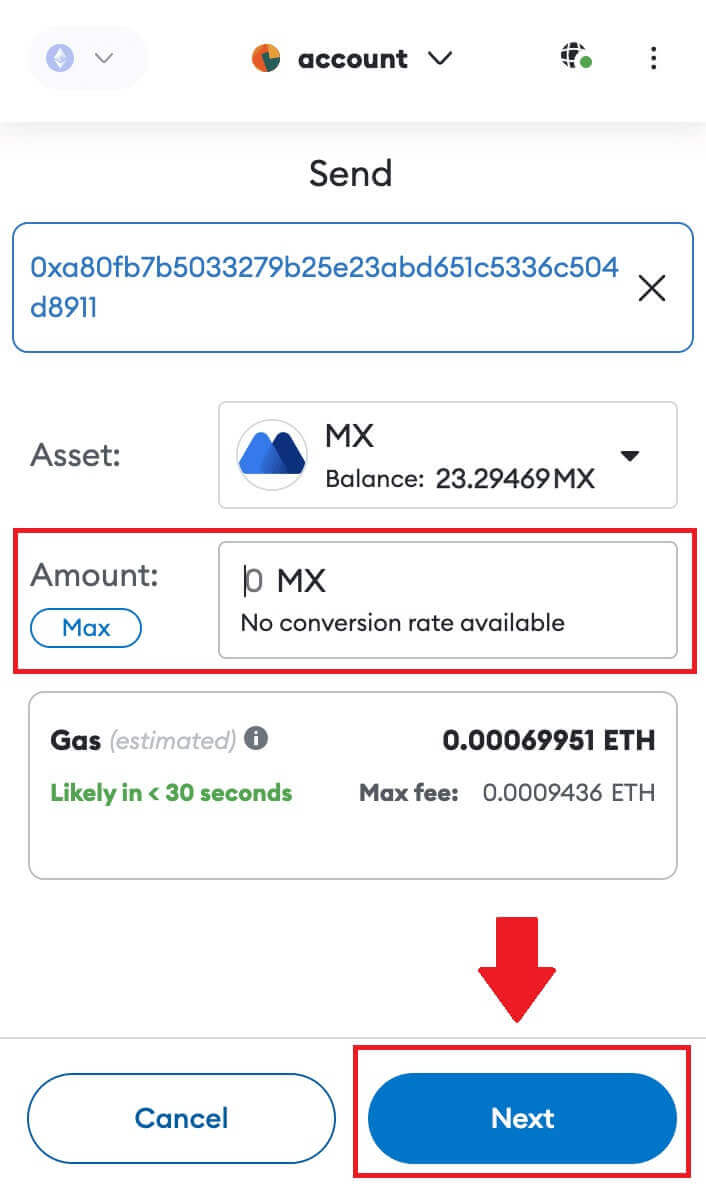
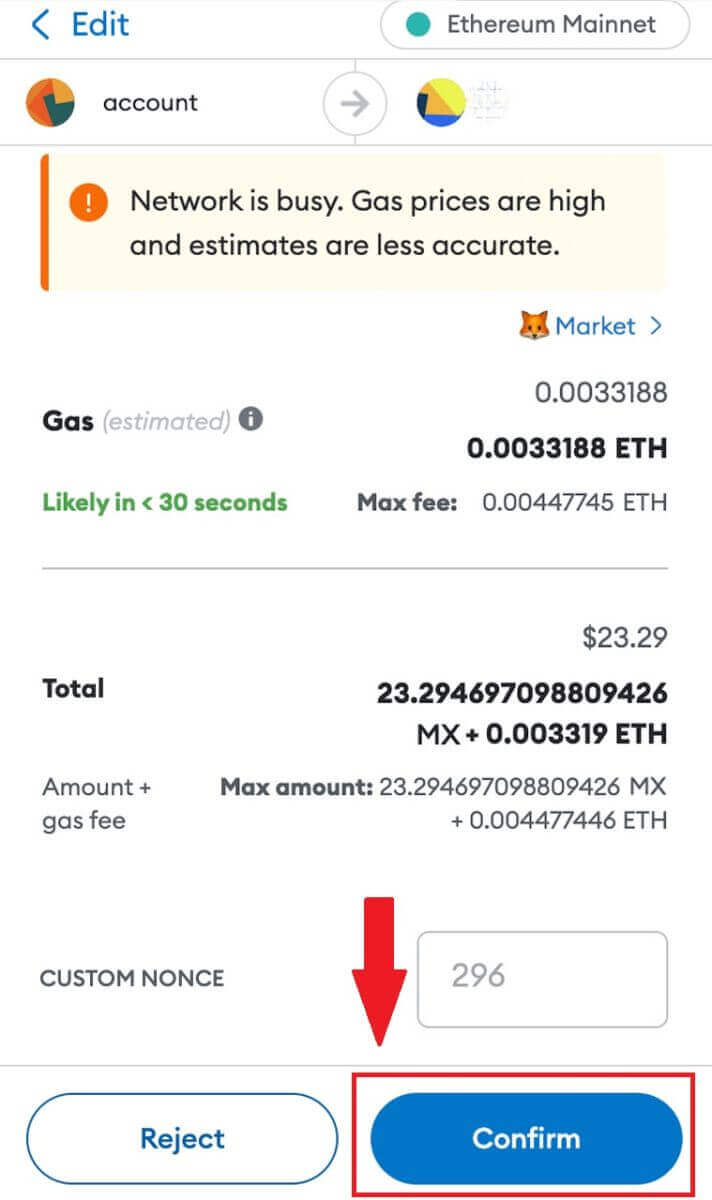
7. Review the withdrawal amount for MX Token, verify the current network transaction fee, confirm that all information is accurate, and then click on [Confirm] to finalize the withdrawal to the MEXC platform. Your funds will be deposited into your MEXC account shortly.
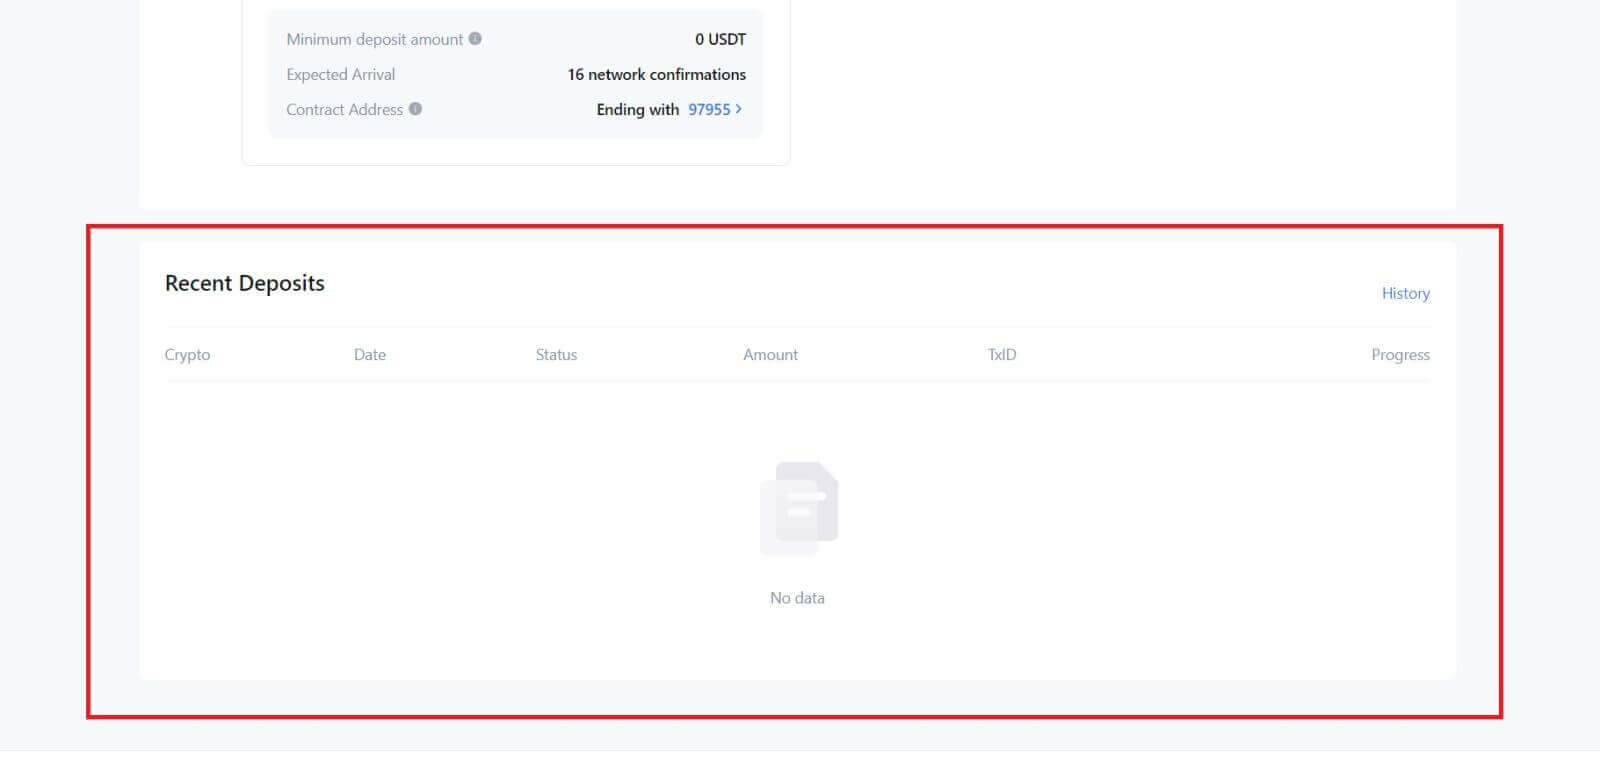
 8. After you request a withdrawal, the token deposit needs confirmation from the blockchain. Once confirmed, the deposit will be added to your spot account.
Check your [Spot] account to see the credited amount. You can find recent deposits at the bottom of the Deposit page, or view all past deposits under [History].
Deposit Crypto on MEXC (App)
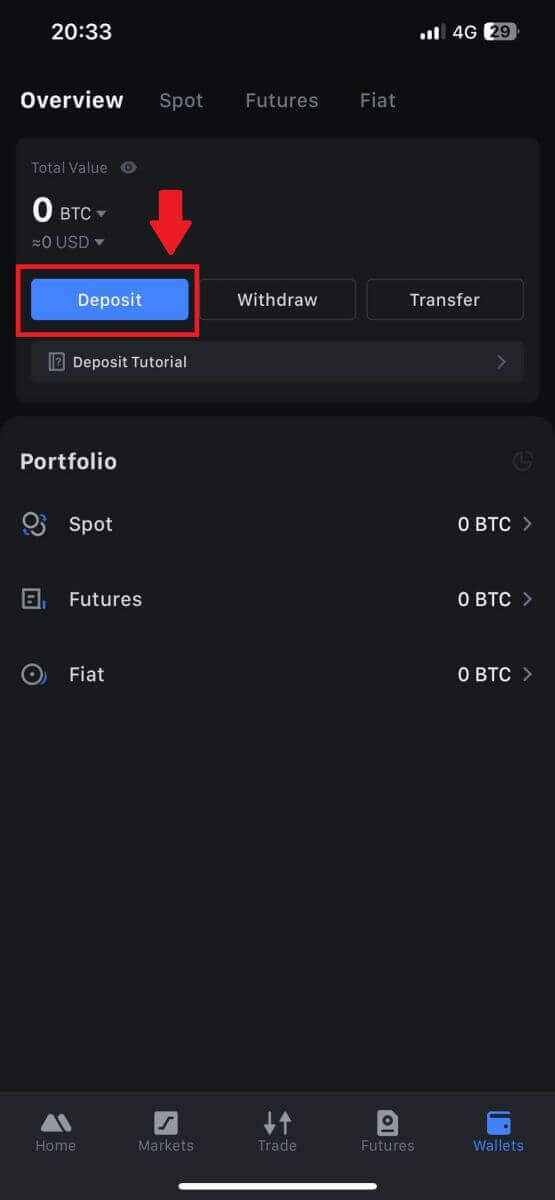
1. Open your MEXC app, on the first page, tap [Wallets].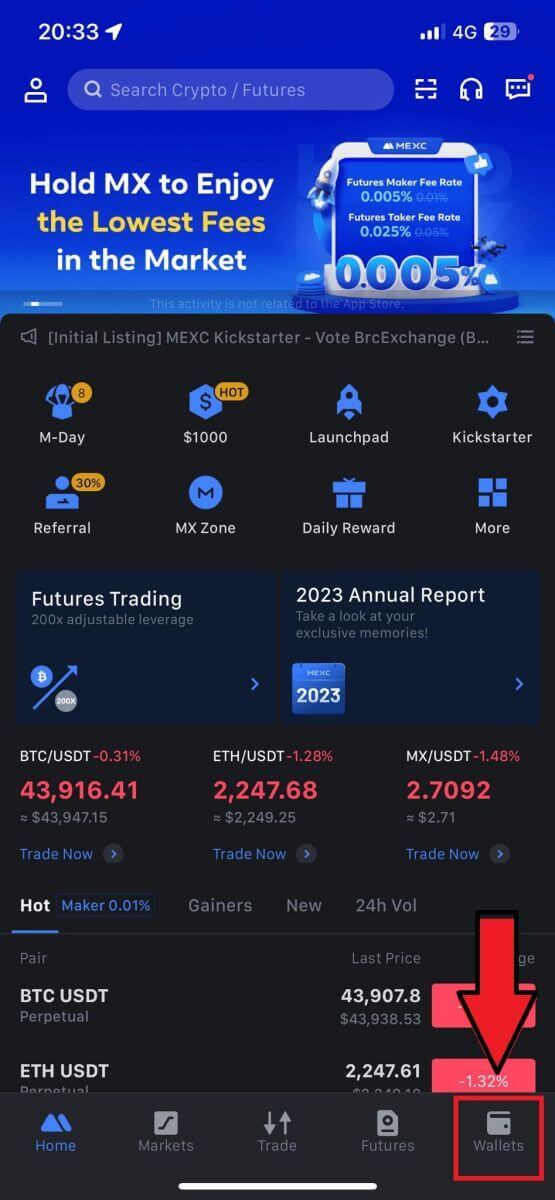
2. Tap on [Deposit] to continue.
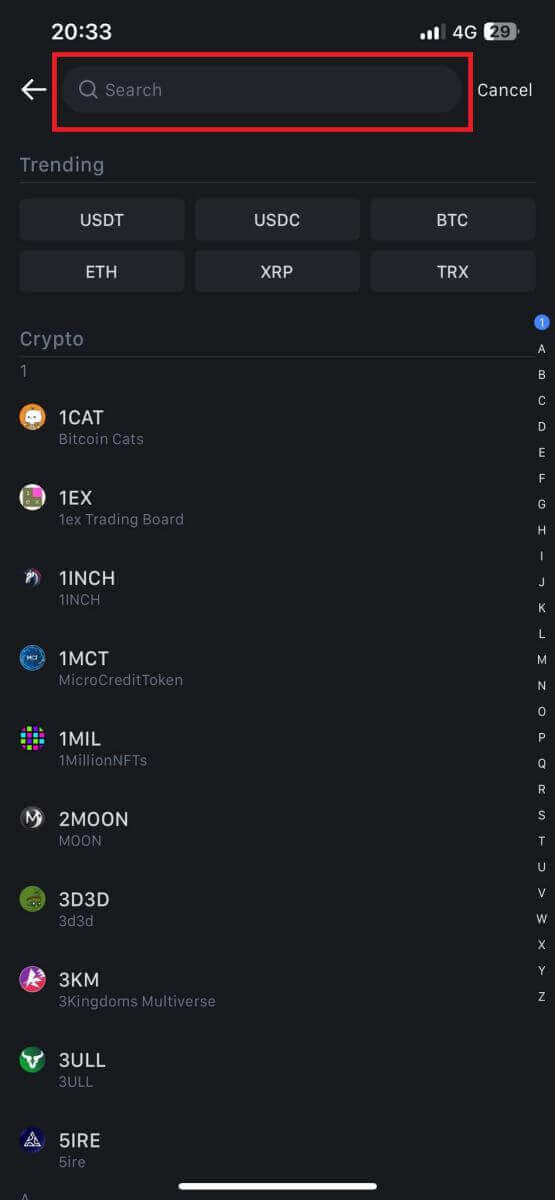
3. Once directed to the next page, select the crypto you want to deposit. You may do so by tap on a crypto search. Here, we are using MX as an example.
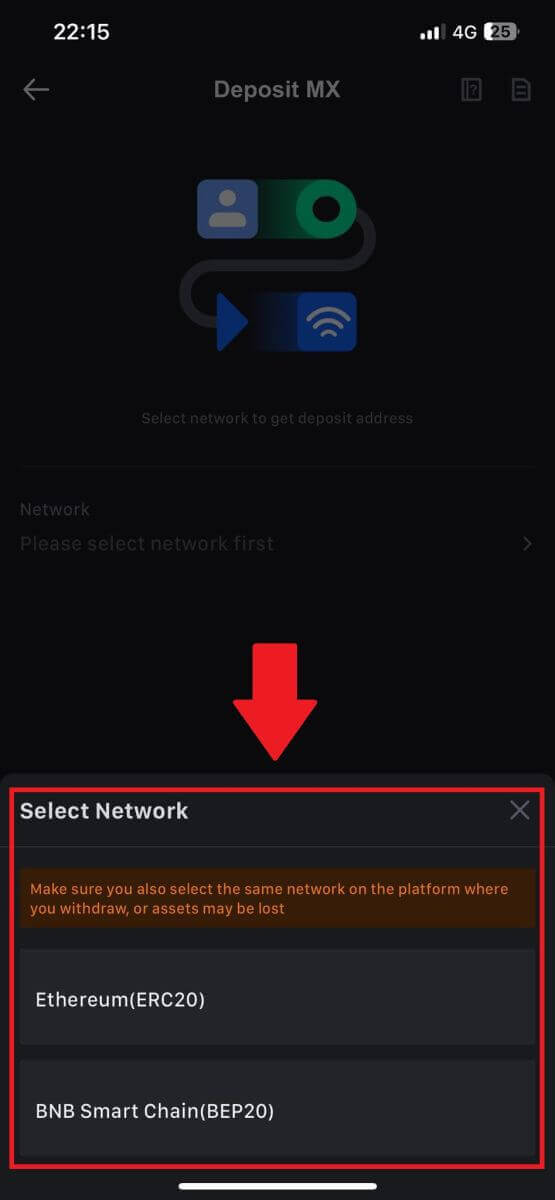
4. On the Deposit page, please select the network.
5. Once you have selected a network, the deposit address and QR code will be displayed.
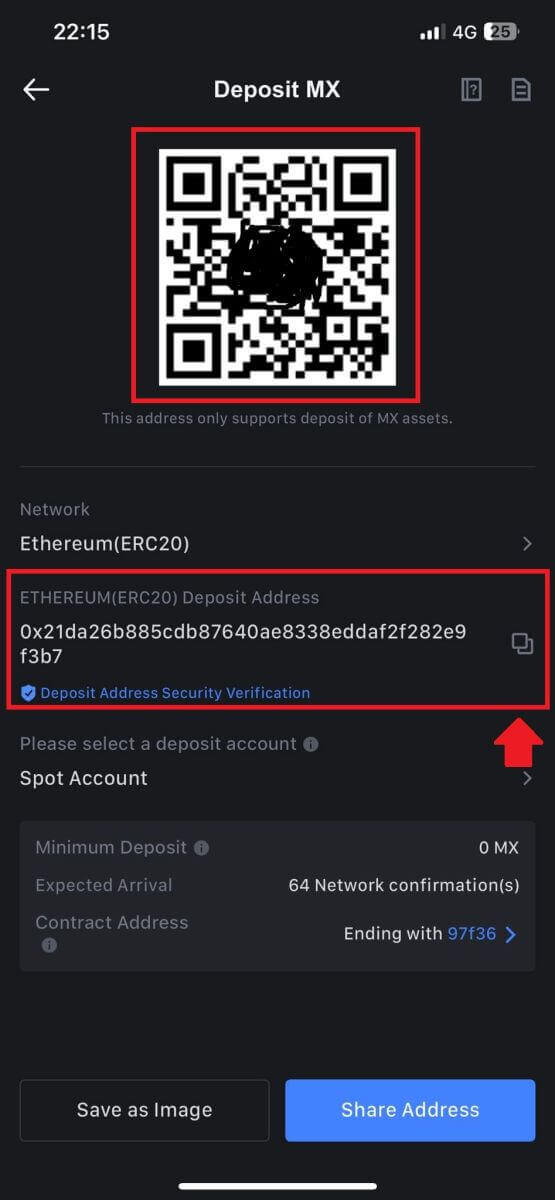
For certain networks like EOS, remember to include a Memo along with the address when making deposits. Without the Memo, your address may not be detected.
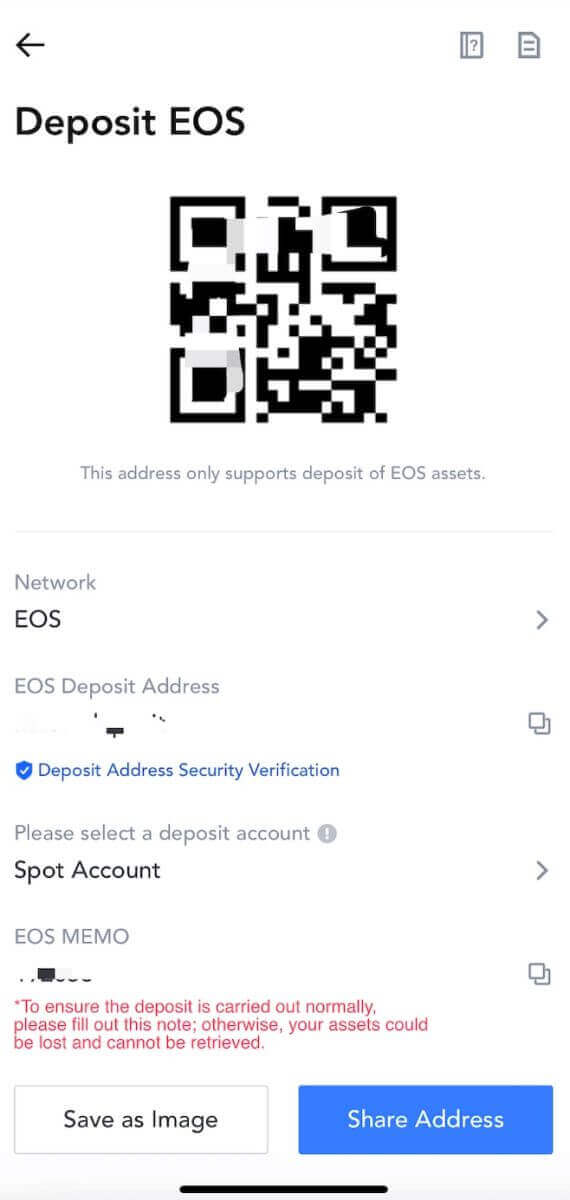
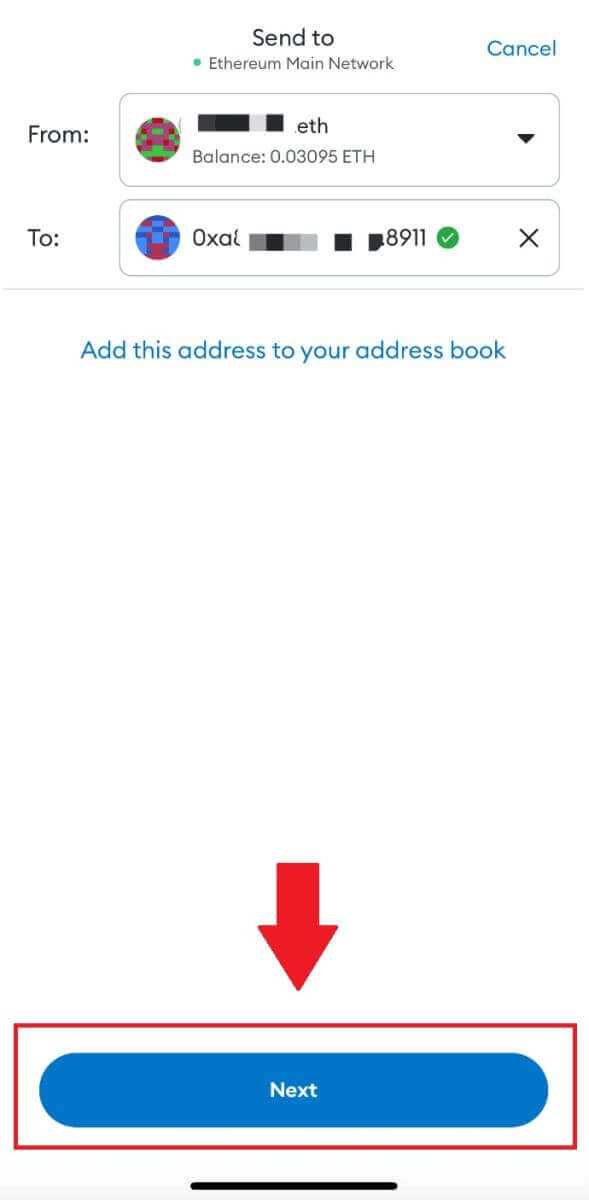
6. Let’s use MetaMask wallet as an example to demonstrate how to withdraw MX Token to the MEXC platform.
Copy and paste the deposit address into the withdrawal address field in MetaMask. Make sure to choose the same network as your deposit address. Tap [Next] to continue.
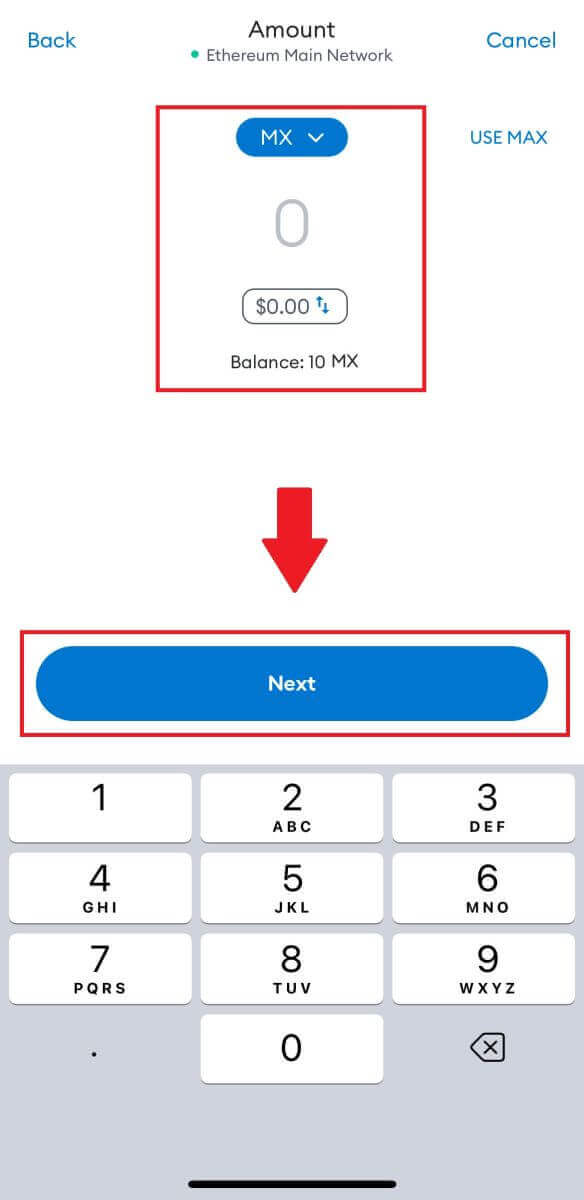
7. Enter the amount you wish to withdraw, then click on [Next].
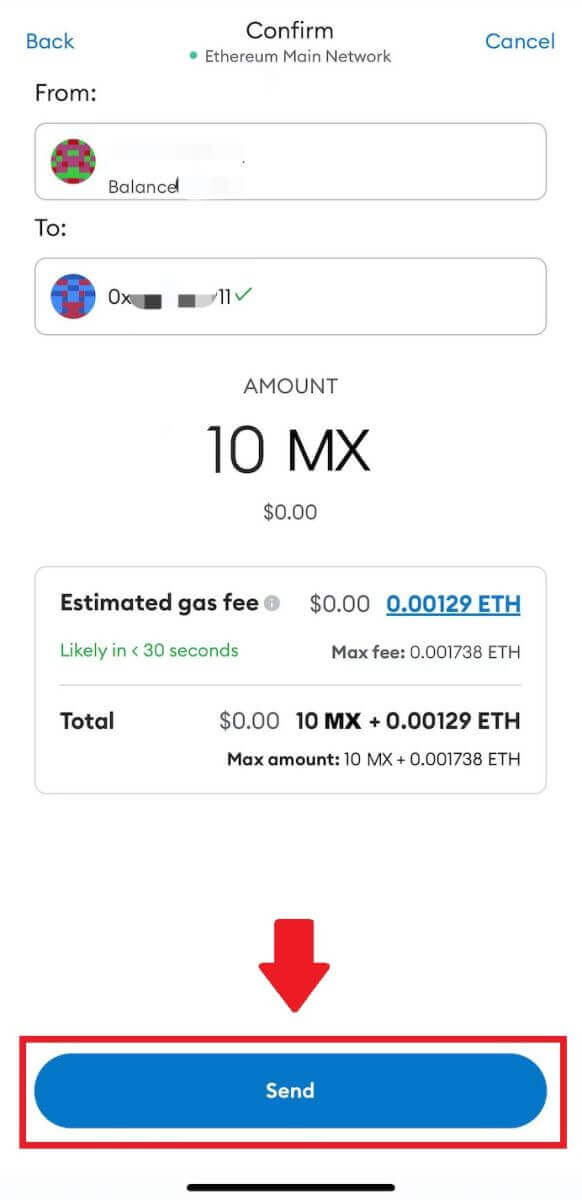
7. Review the withdrawal amount for MX Token, verify the current network transaction fee, confirm that all information is accurate, and then click on [Send] to finalize the withdrawal to the MEXC platform. Your funds will be deposited into your MEXC account shortly.
Frequently Asked Questions (FAQ)
What is a tag or meme, and why do I need to enter it when depositing crypto?
A tag or memo is a unique identifier assigned to each account for identifying a deposit and crediting the appropriate account. When depositing certain crypto, such as BNB, XEM, XLM, XRP, KAVA, ATOM, BAND, EOS, etc., you need to enter the respective tag or memo for it to be successfully credited.How to check my transaction history?
1. Log in to your MEXC account, click on [Wallets], and select [Transaction History].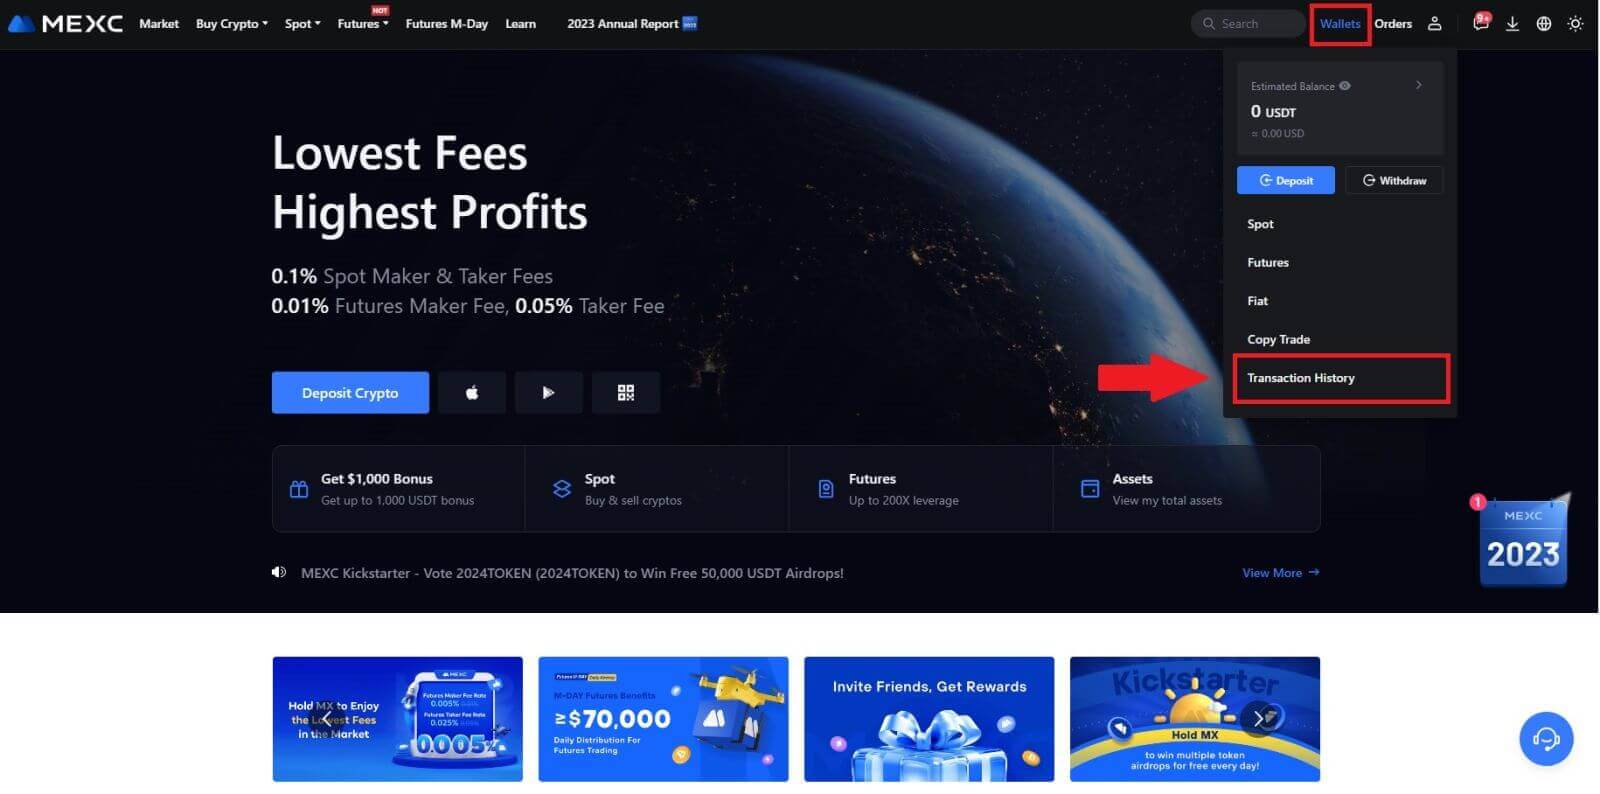
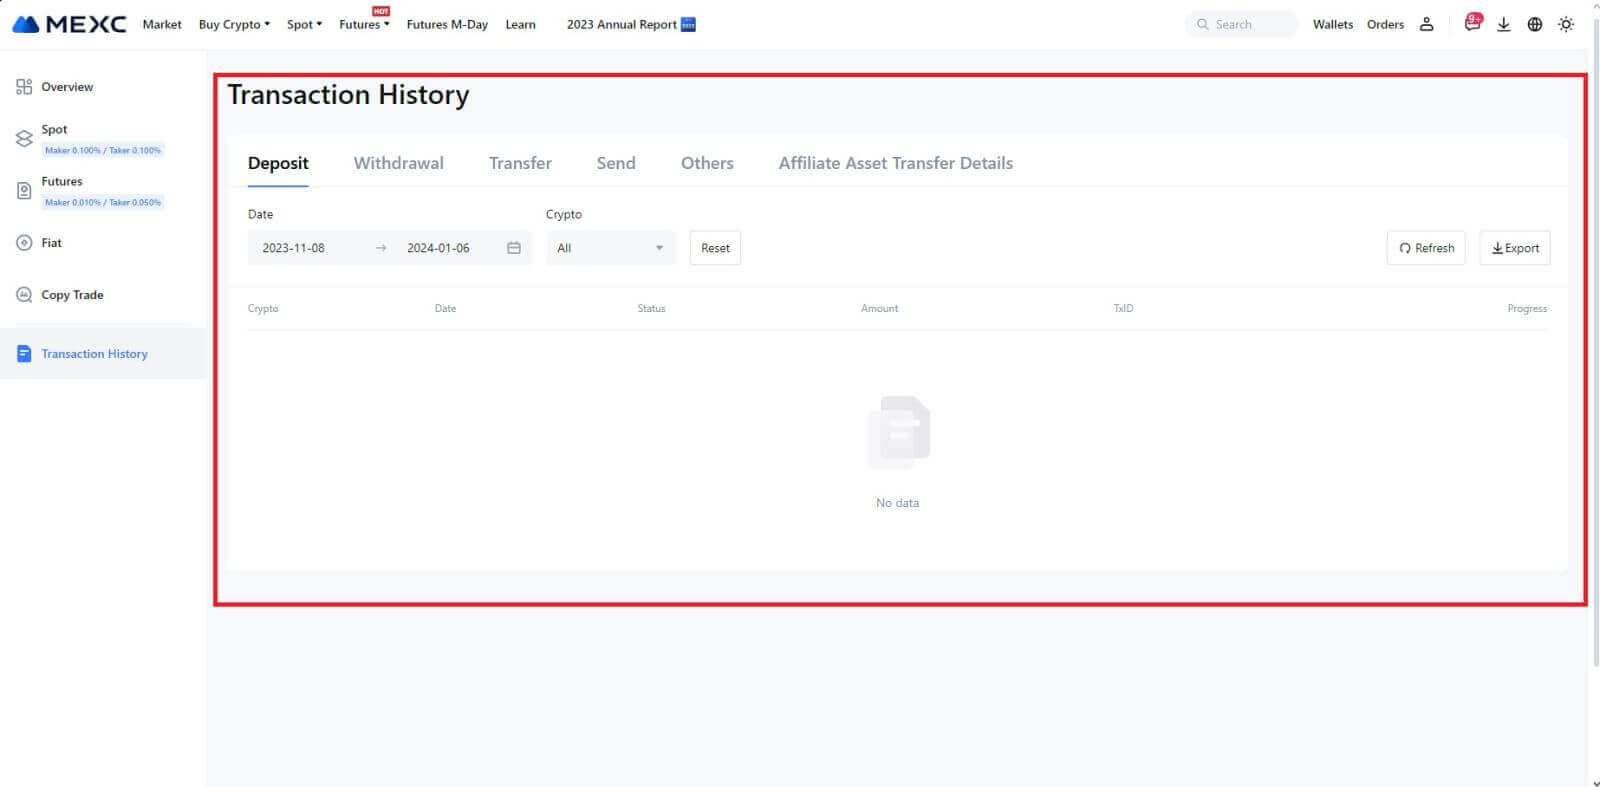
2. You can check the status of your deposit or withdrawal from here.
Reasons for Uncredited Deposits
1. Insufficient number of block confirmations for a normal deposit
Under normal circumstances, each crypto requires a certain number of block confirmations before the transfer amount can be deposited into your MEXC account. To check the required number of block confirmations, please go to the deposit page of the corresponding crypto.
Please ensure that the cryptocurrency you intend to deposit on the MEXC platform matches the supported cryptocurrencies. Verify the full name of the crypto or its contract address to prevent any discrepancies. If inconsistencies are detected, the deposit may not be credited to your account. In such cases, submit a Wrong Deposit Recovery Application for assistance from the technical team in processing the return.
3. Depositing through an unsupported smart contract methodAt present, some cryptocurrencies cannot be deposited on the MEXC platform using the smart contract method. Deposits made through smart contracts will not reflect in your MEXC account. As certain smart contract transfers necessitate manual processing, please promptly reach out to online customer service to submit your request for assistance.
4. Depositing to an incorrect crypto address or selecting the wrong deposit network
Ensure that you have accurately entered the deposit address and selected the correct deposit network before initiating the deposit. Failure to do so may result in the assets not being credited. In such a scenario, kindly submit a [Wrong Deposit Recovery Application] for the technical team to facilitate the return processing.


